
Forget fancy cakes; the true measure of celebration is a sticky, cream-filled explosion. The aroma of cardamom and vanilla, wafting from the oven, signals that it is time for pure, unadulterated joy.
These gorgeous pastries, known officially asDanish Carnival Buns: A Delicious Treat for Festive Celebrations, are the fluffy, sweet antidote to winter gloom, perfect for sharing (or, let’s be honest, hoarding).
- Achieve unparalleled fluffy dough texture using a simple overnight proofing method that maximizes flavor development and lift for the final bake.
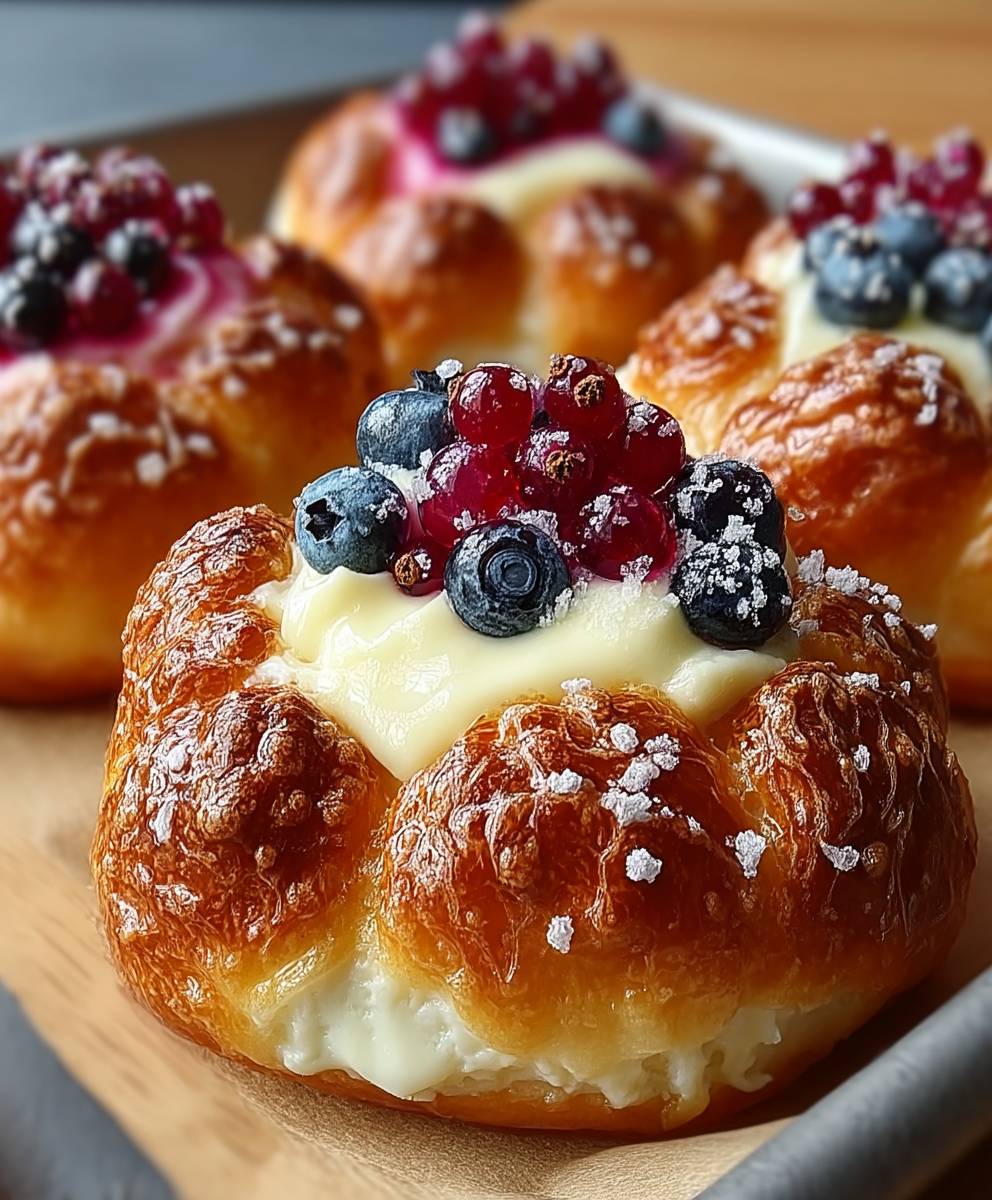
- The irresistible flavor profile balances warm cardamom spice with a lush, creamy vanilla custard filling, making every bite decadent yet light.
- These visually appealing buns are topped with a bright lemon glaze and colorful sprinkles, transforming them into edible works of festive art easily.
- Incredibly versatile, these sweet yeasted rolls adapt beautifully to various fillings, from chocolate spreads to fruit jams, suiting any sweet craving.
Embracing the Chaos: The Tradition Behind These Sweet Rolls
Before we dive into the sticky details of custard perfection, you need to understand the history of this magnificent sweet roll. These aren’t just breakfast buns; they are a tradition tied to pre-Lenten festivals, meant to load everyone up on sugar and joy before the more somber seasons arrive. Imagine a chilly February morning, where the streets are filled with people wearing silly hats, and every bakery window displays mountains of these glazed delights. It’s truly magnificent chaos.
I remember my first attempt at making these rolls. I was 16, convinced I was a pastry prodigy, and decided to double the recipe right before a huge family gathering. The dough rose so enthusiastically that it tried to escape the mixing bowl and migrate directly onto the kitchen floor. It looked less like dough and more like a happy, yeasty monster attempting to conquer the countertop. Lesson learned: yeast respects no boundaries, especially when you are aiming for true Danish celebratory pastries. The trick, I learned, is patience and a warm environment—not sheer force of will.
Properly prepared, these buns offer a texture contrast that few other baked goods can match: a tender, airy bread surrounding a silky, rich interior, all capped with a vibrant, tart glaze. This combination makes them highly addictive and ensures they disappear faster than a magician’s rabbit at any party. They are the perfect centerpiece for any mid-winter gathering or just a fantastic way to make an ordinary Tuesday feel extraordinarily special.
Mastering the Perfect Custard Filling
The secret to legendary carnival buns isn’t just the light, fluffy bread; it’s the filling. We use a rich, scratch-made vanilla custard (Crème Pâtissière) that is luscious and holds its shape during baking. To ensure absolute silkiness, use high-quality vanilla bean paste or extract, and be methodical when tempering the egg yolks. If you want a truly stable custard without relying on animal pectin, a tiny bit of high-quality cornstarch or potato starch works wonders. Whisk constantly as the mixture thickens over medium heat. When it coats the back of a spoon thickly, pull it off the heat immediately and press plastic wrap directly onto the surface to prevent a skin from forming. Allowing the custard to cool completely before assembly is critical; warm custard will turn your beautiful buns into a sloppy mess—a delicious mess, perhaps, but sloppy nonetheless.
Ingredients for Danish Carnival Buns: A Delicious Treat for Festive Celebrations
Here’s what you’ll need to make this delicious dish:
- All-Purpose FlourThe base of our light dough, ensure it is measured accurately, preferably by weight, to guarantee the right consistency and texture.
- Whole Milk and EggsThese provide richness and moisture to the dough; make sure they are lukewarm (milk) and at room temperature (eggs) for optimal yeast activity.
- Active Dry YeastEssential for lift and flavor development; ensure your yeast is fresh by proofing it first in a mixture of warm milk and a pinch of sugar.
- CardamomThis crucial spice is the defining flavor of Scandinavian baking, providing a warm, slightly citrusy aroma that elevates the sweetness.
- Unsalted ButterNeeds to be soft, but not melted, for the creaming process, which incorporates air and structure into the dough.
- Granulated SugarUsed both in the dough and the custard to provide sweetness and help activate the yeast during the proofing stage.
- Vanilla Bean Paste or ExtractUsed generously in the custard to deliver deep, unmistakable vanilla flavor, essential for balancing the tart glaze.
- Plant-Based Starch (Corn or Potato)Used as a thickener for the creamy custard filling, ensuring it remains stable and sets perfectly inside the baked buns.
- Powdered Sugar and Lemon JuiceThese two form the simple, yet vital, bright glaze that contrasts beautifully with the rich, spiced bun.
The full ingredients list, including measurements, is provided in the recipe card directly below.
How to Make Danish Carnival Buns: A Delicious Treat for Festive Celebrations
Follow these simple steps to prepare this delicious dish:
Step 1: Preparing the Dough and First Proofing
In a stand mixer bowl, combine the lukewarm milk, yeast, and a tablespoon of sugar. Let it sit for 5 to 10 minutes until foamy. Add the remaining sugar, softened butter, salt, cardamom, and eggs. Gradually incorporate the flour until a soft, slightly sticky dough forms. Knead for about 8 minutes until smooth and elastic. Place the dough in a lightly oiled bowl, cover tightly, and allow it to proof in a warm spot for 1.5 to 2 hours, or until doubled in size.
Step 2: Constructing the Vanilla Custard Filling
While the dough proofs, prepare the vanilla custard. Whisk together the egg yolks, sugar, and starch until smooth. Heat the milk in a separate saucepan until simmering. Slowly temper the hot milk into the egg mixture while whisking vigorously. Return the entire mixture to the saucepan and cook over medium heat, stirring constantly, until the mixture thickens significantly. Remove from heat, stir in the vanilla, and immediately chill the custard, ensuring it is completely cooled before the next step.
Step 3: Shaping the Buns and Second Proofing
Gently punch down the risen dough and turn it out onto a lightly floured surface. Roll the dough into a large rectangle, approximately 12×18 inches. Cut the dough into 12 equal squares. Place a generous spoonful of the cooled custard filling in the center of each square. Bring the four corners of the dough together over the filling and pinch them tightly in the middle, creating a small bundle. Place the shaped buns, pinched side down, onto a baking sheet lined with parchment paper. Cover and allow a second proofing for 30–45 minutes.
Step 4: Baking and Glazing
Preheat your oven to 400°F (200°C). Brush the tops of the buns lightly with an egg wash (one egg whisked with a splash of water). Bake for 12 to 15 minutes, or until deeply golden brown. While the buns cool slightly, whisk together the powdered sugar and lemon juice until you achieve a thick, smooth glaze. Once the buns are mostly cool, drizzle the bright glaze generously over the tops and add festive sprinkles or chopped nuts immediately for decoration.
Transfer to plates and drizzle with sauce for the perfect finishing touch.
Troubleshooting Tips for Fluffy Carnival Buns
Even experienced bakers face challenges, especially when dealing with yeasted doughs. If your dough isn’t rising, the most common culprit is inactive yeast or milk that was too hot, which essentially killed the yeast before it could start working. Ensure the liquid is just lukewarm—around 105°F (40°C). Another common error is using too much flour; the dough should remain slightly tacky. If the custard leaks during baking, you didn’t pinch the corners firmly enough, or the custard was too warm when added. Ensure your baking sheet has adequate spacing between the buns, as crowding prevents proper air circulation and leads to uneven baking.
Pairing Suggestions and Modern Variations
While the classic preparation of these celebratory pastries is divine, modern bakers love customization. You can easily substitute the vanilla custard with a rich, dark chocolate pastry cream or incorporate a swirl of tangy raspberry preserves into the center alongside the vanilla. For a savory twist, which might sound wild but works, try filling the buns with a spiced minced turkey mixture before baking. Remember to adjust the sugar content in the dough slightly if moving away from a traditional sweet profile. These buns pair wonderfully with a strong cup of coffee or a slightly tart fruit punch, balancing the sweetness perfectly. They also make excellent treats for gifting during holidays or special occasions when you need something that truly screams “homemade comfort.”
Adding Extra Sparkle: Decoration and Presentation
Presentation matters immensely when serving something as joyful as this festive treat. Instead of just a simple glaze, consider dividing the glaze into smaller bowls and using natural food coloring (beetroot powder for pink, spinach powder for green) to create a multi-colored icing effect. Alternatively, dust the buns with fine powdered sugar after baking for a subtle, snowy appearance, which contrasts beautifully with the golden-brown crust. Serving them warm is always recommended, but they store well in an airtight container for up to three days, making them excellent prep-ahead options for busy weeks.
Frequently Asked Questions About Danish Carnival Buns
To help you perfect this recipe, we address some of the most common questions we hear:
Can I make the dough ahead of time?
Yes, absolutely. You can prepare the dough through the kneading step, then place it in the refrigerator for a slow, cold proofing overnight. This method actually enhances the flavor development. Pull the dough out about an hour before you plan to roll and shape it to allow it to warm up slightly.
What is the difference between Danish Carnival Buns and Danish Pastries?
While both are yeast-risen Danish treats, the carnival buns (Fastelavnsboller) use a softer, simpler sweet bread dough, similar to brioche, and are baked once the filling is added. Traditional Danish Pastries (Wienerbrød) rely on a heavily laminated, flaky dough created by folding butter repeatedly into the dough before shaping and baking.
How should I store leftovers?
Store any leftover buns in an airtight container at room temperature for up to three days, though they are best enjoyed fresh on the day they are baked. If you need to keep them longer, you can freeze unbaked, shaped buns (before the second proofing) for up to one month, then thaw, proof, and bake as usual.
Making theseDanish Carnival Buns: A Delicious Treat for Festive Celebrationsis a rewarding process that fills your home with the most incredible aromas. Whether you are celebrating a specific occasion or simply indulging in a moment of sweet happiness, these soft, cream-filled rolls deliver comfort and joy in every bite. Go ahead, embrace the sticky fingers, and let the festivities begin!
The first time I attempted to make Danish Carnival Buns, orFastelavnsboller, I accidentally glued my oven mitt to the counter with sticky glaze. It was a disaster worthy of a slapstick comedy, yet the resulting pastries were so divinely fluffy and creamy that the sticky situation instantly became a hilarious victory. These aren’t just mere pastries; they are edible celebrations, traditionally enjoyed during the Scandinavian version of pre-Spring Season revelry, known as Fastelavn. Forget the sad, dusty donuts you sometimes find; these buns are puff pastry marvels bursting with smooth vanilla custard, often topped with a vibrant sugar glaze that screams joy. They demand attention, patience, and a willingness to embrace a little flour dust—but trust me, the reward is worth every chaotic moment in your kitchen.
The History and Charm of Danish Carnival Buns: A Delicious Treat for Festive Celebrations
When February rolls around, Danes know exactly what time it is: time for elaborate, cream-filled sugar bombs. Fastelavn is Denmark’s equivalent of a pre-spring celebration, and while the traditions include children dressed up and “beating the cat out of the barrel” (don’t worry, it’s just candy now), the true star is always the bun. Historically, Fastelavnsboller were simple, wheat flour rolls, but over the centuries, they evolved into the luxurious, custard-filled pastries we adore today. They represent indulgence before the lean times, although nobody seems keen on stopping after just one. They bring an irresistible warmth and sweetness to cold winter months, transforming any gloomy afternoon into a colorful, celebratory gathering.
Making these glorious treats at home might seem intimidating, but the process is deeply rewarding. We separate the recipe into two major types: the classic yeast bun (more bread-like) and the modern puff pastry version (flakier and faster). For peak flakiness and flavor complexity, we focus here on the puff pastry rendition. It requires precision in folding but delivers that satisfying crunch and melt-in-your-mouth filling that defines the perfect Danish Carnival Bun.
Essential Ingredients for Fluffy Fastelavnsboller
Success lies in using quality ingredients, especially the vanilla for your custard filling. Do not skimp on the real vanilla bean paste; the fragrance alone will transport you straight to a quaint Danish bakery. We utilize ready-made puff pastry for efficiency, but feel free to tackle a homemade dough if you feel particularly ambitious.
The Creamy Custard Filling
- 2 cups whole milk
- 1 vanilla bean, split, or 1 tablespoon vanilla bean paste
- 1/2 cup granulated sugar
- 1/4 cup cornstarch
- 4 large egg yolks
- 1 tablespoon unsalted butter
The Dough and Assembly
- 1 package (14 oz) all-butter puff pastry, thawed but chilled
- 1 large egg, beaten (for egg wash)
- Optional fillings: Raspberry jam or finely chopped candied lemon peel
The Icing Glaze
- 2 cups powdered sugar
- 3-4 tablespoons water or fresh lemon juice (for a zingy twist)
- Food coloring (optional, for vibrant carnival colors)
Crafting the Perfect Custard (Crème Pâtissière)
The custard must be incredibly thick and stable to prevent it from oozing out of the delicate pastry while baking. This is the heart of the Danish Carnival Buns: A Delicious Treat for Festive Celebrations.
First, heat the milk and vanilla in a medium saucepan until just simmering. While that heats, whisk together the sugar and cornstarch in a separate bowl. Whisk in the egg yolks until the mixture turns pale yellow and smooth. Slowly temper the hot milk mixture into the egg mixture, whisking constantly to prevent scrambling.
Return this entire mixture to the saucepan and cook over medium heat, stirring vigorously with a spatula. The custard will thicken dramatically. Once it starts to bubble and looks like thick pudding, remove it from the heat. Stir in the butter until melted. Pour the custard into a shallow bowl, cover the surface directly with plastic wrap (this prevents a skin from forming), and chill completely—at least four hours, but preferably overnight. A cold, firm custard is non-negotiable for successful buns.
Assembling and Baking the Danish Carnival Buns
Preheat your oven to 400°F (200°C). Line two baking sheets with parchment paper.
Unfold your chilled puff pastry and roll it slightly, making sure it stays cold. Cut the pastry into 12 equal squares (approximately 3.5 inches each). Place a tablespoon of chilled custard directly in the center of each square. If you are using jam or candied peel, place it on top of the custard.
Now comes the crucial part: folding. Bring all four corners of the pastry square together above the filling, pinching them firmly in the center to seal the bun completely. You must ensure there are no gaps, or the custard will escape during baking, leading to flat, sticky sadness. Brush the entire surface of the sealed buns liberally with the egg wash. This gives them that beautiful golden sheen.
Bake for 15 to 20 minutes, or until the buns are puffed, deeply golden, and flaky. Let them cool on the baking sheet for a few minutes before transferring them to a wire rack to cool completely before glazing. Cooling is crucial—applying glaze to a hot bun results in a runny mess.
Perfecting the Cooking Process

Always prepare the vanilla custard filling the day before, ensuring it is rock solid and thoroughly chilled before assembly. This prevents leakage and maintains the bun’s shape during the hot baking process. Focus on sealing the corners tightly, creating a protective dome for the creamy interior.
Add Your Touch
Get creative by experimenting with different fillings; try swapping raspberry jam for spiced apple butter or a tangy lemon curd for contrast. You can also mix a small amount of finely ground cardamom into the dough before baking, lending a distinctly Nordic aroma to these festive pastries.
Storing & Reheating
Store unglazed buns in an airtight container at room temperature for up to two days. Once glazed, they are best eaten the same day for maximum freshness. If reheating, warm briefly in a 300°F oven for five minutes to restore flakiness, but avoid overheating the filling.
Once, during a Fastelavn party, my neighbor claimed his grandmother’s buns were better, but then he ate four of mine and spent the rest of the evening in a blissful sugar coma, which I consider definitive proof of victory.
- Ensure the puff pastry remains cold while working; warm dough becomes elastic and loses its ability to puff up spectacularly in the oven.
- Do not overfill the pastry squares with custard. Too much filling puts pressure on the seams, causing catastrophic explosions during the baking cycle.
- Use lemon juice instead of water in the glaze for a sharper flavor that cuts beautifully through the rich vanilla custard and creamy pastry.
Flavor Pairings and Serving Suggestions
These majestic buns pair perfectly with strong, black coffee, which balances the sweetness of the glaze and custard. If you prefer something lighter, a robust cup of Earl Grey tea provides aromatic contrast. When serving Danish Carnival Buns: A Delicious Treat for Festive Celebrations, arrange them dramatically on a tiered platter, ensuring the icing is vibrant. If you really want to embrace the festive spirit, top some with a dollop of fresh whipped cream after they have cooled.
For a spectacular presentation, consider dividing your icing glaze and coloring different batches—bright pink, sunshine yellow, and cobalt blue—to truly mimic the fun and chaos of a carnival celebration. Drizzle them artistically over the cooled pastries, letting the colors drip down the sides for a professional bakery finish that will impress even the toughest critic.
Frequently Asked Questions About Fastelavnsboller
Can I make the dough from scratch instead of using puff pastry?
Absolutely! Traditional Fastelavnsboller often use a yeast-raised dough, similar to brioche, which results in a softer, more bread-like bun. If you choose this route, allow extra time for the dough to proof twice and follow the same filling and sealing methods.
How do I prevent the custard from leaking while baking?
The secret lies in the temperature of the custard and the tightness of the seal. Make sure the custard is very cold and firm, like thick paste, when you place it on the dough. Also, pinch the four corners of the dough together robustly and give the seam an extra crimp to create a solid enclosure.
Can these sweet celebratory buns be frozen?
You can freeze the unbaked buns. Assemble them completely, place them on a baking sheet, and freeze until solid. Once frozen, transfer them to a freezer bag. Bake directly from frozen, adding about 5 to 10 minutes to the baking time. Do not freeze the buns once they have been glazed.
What makes the Danish Carnival Buns different from a regular Danish pastry?
While both use rich dough, traditional Danish pastries (often called Viennese dough in Denmark) usually rely on laminated dough and are often open-faced with fruit or almond paste. Fastelavnsboller are generally completely closed, spherical buns dedicated specifically to the Fastelavn holiday, and always feature a generous, hidden core of custard and sometimes cream.
These Danish Carnival Buns: A Delicious Treat for Festive Celebrations are more than just a recipe; they are an experience. They bring light, laughter, and an unparalleled level of cozy sweetness to any occasion. Go ahead, make a mess, embrace the challenge, and enjoy the glorious payoff of a perfect, golden, cream-filled bun.
The Secret History of Fastelavnsboller: Sweet Treats and Snow Days
There is nothing quite like February in the Nordic countries. It is dark, often miserably cold, and tradition dictates that you must eat vast quantities of cream-filled pastry. This is the magic of Fastelavn—the Nordic version of Carnival—where we celebrate with the legendary Danish Carnival Buns. Forget complicated cooking; this is baking designed to bring pure, unadulterated joy (and possibly a significant sugar crash).
I remember my first attempt at making these Fastelavnsboller. I thought, “It’s just dough and cream, how hard can it be?” Reader, it was a disaster. My first batch exploded dramatically in the oven, creating what looked like giant, sugary marshmallows that had spontaneously combusted. Over the years, however, I mastered the delicate dance of yeasted dough and rich pastry cream. Trust me when I say that following this guide will prevent your own pastry explosion and result in perfect, fluffy buns, ideal for any festive gathering.
Mixing Magic: Essential Ingredients for the Perfect Pastry
These magnificent Danish festive buns require patience, but the ingredient list is straightforward. We are aiming for a pillowy dough shell wrapped around a decadent filling, usually traditional pastry cream, or sometimes a dollop of high-quality raspberry jam for zing. Remember to use ingredients at room temperature to ensure the yeast activates optimally.
For the Sweet Yeast Dough
- 1 cup (240ml) warm milk (about 105°F / 40°C)
- 1/4 ounce (7g) active dry yeast
- 1/4 cup granulated sugar, plus 1 teaspoon
- 1 large egg, room temperature
- 1/2 cup unsalted butter, softened
- 1 teaspoon ground cardamom
- 1/2 teaspoon salt
- 3 1/2 cups all-purpose flour, plus extra for dusting
For the Crème Pâtissière (Pastry Cream Filling)
- 2 cups whole milk
- 4 large egg yolks
- 1/2 cup granulated sugar
- 1/4 cup cornstarch
- 2 tablespoons unsalted butter
- 1 teaspoon vanilla bean paste
For Assembly and Glaze
- 1 beaten egg (for egg wash)
- 1 cup powdered sugar
- 2-3 tablespoons water or lemon juice
- Optional: 1 cup heavy whipping cream, whipped stiffly (to fold into cooled pastry cream)
The Baking Ballet: Step-by-Step Instructions
Baking these sweet pastries is a process broken into three main stages: making the dough, preparing the filling, and finally, assembling the buns before their grand oven entrance. Do not rush the dough proofing—that is where the volume and lightness come from!
Creating the Light and Airy Dough
First, activate the yeast. Combine the warm milk, 1 teaspoon of sugar, and yeast in a small bowl. Let it sit for about 10 minutes until foamy. Next, in a large mixing bowl, combine the remaining sugar, salt, cardamom, and flour. Add the activated yeast mixture and the egg. Mix until a shaggy dough forms.
Now, knead. Incorporate the softened butter piece by piece while kneading, either by hand or using a stand mixer with a dough hook. Continue kneading for 8–10 minutes until the dough is smooth and elastic. Place the dough in a lightly oiled bowl, cover it, and let it rise in a warm spot until doubled in size, which usually takes 60 to 90 minutes.
Whipping Up the Velvety Filling
While the dough proofs, prepare the crème pâtissière. Whisk the egg yolks and sugar together in a medium saucepan until pale. Whisk in the cornstarch. Slowly whisk in the milk. Place the saucepan over medium heat, stirring constantly with a whisk until the mixture thickens significantly and comes to a gentle boil. Remove it immediately from the heat.
Stir in the vanilla bean paste and butter until fully incorporated and smooth. Transfer the cream to a clean bowl, cover the surface directly with plastic wrap (to prevent a skin from forming), and chill completely in the refrigerator. If using whipped cream for an even richer filling, fold the stiffly whipped heavy cream into the cooled pastry cream right before assembly.
Shaping and Baking Danish Carnival Buns
Punch down the risen dough and turn it out onto a lightly floured surface. Roll the dough into a large rectangle, roughly 1/4 inch thick. Cut the rectangle into 12 squares. Place a spoonful of the chilled pastry cream (or cream mixture) right in the center of each square. Do not overfill! Overfilling leads to the dreaded pastry explosion I warned you about.
To seal the buns, pull the four corners of the dough up toward the center and pinch them together securely. Pinch all the seams tightly to form a neat ball, ensuring the filling is completely enclosed. Place the buns seam-side down on a parchment-lined baking sheet, spaced well apart. Brush the tops gently with the egg wash. Bake in a preheated oven at 375°F (190°C) for 12–15 minutes, or until deeply golden brown. Let them cool slightly before glazing.
The Final Flourish: Glaze and Serve
Whisk together the powdered sugar and enough liquid (water or lemon juice) to create a thick, pourable glaze. Drizzle the glaze generously over the cooled fastelavnsboller. These are best served fresh, ideally with a strong cup of coffee while admiring the snow outside. Enjoy this delicious treat for festive celebrations!
Conclusion for Danish Carnival Buns: A Delicious Treat for Festive Celebrations
Mastering the Danish Carnival Buns means embracing a wonderful tradition of cozy, sugary indulgence. These fluffy, cream-filled Fastelavnsboller are far more than just a pastry; they are a delightful centerpiece for any cold-weather celebration. By following the steps closely—especially those relating to dough proofing and proper sealing—you ensure a perfect outcome every time.
Whether you stick to the classic vanilla pastry cream or venture into fruit fillings, these sweet, cardamom-spiced buns promise to be a massive hit. Gather your ingredients, enjoy the baking process, and share this truly delicious treat for festive celebrations with everyone you hold dear. Happy baking!
FAQs
How long can I store Danish Carnival Buns: A Delicious Treat for Festive Celebrations after baking?
These festive Danish pastries taste best on the day they are baked due to the fresh yeast dough and the creamy filling. If you have leftovers, store them in an airtight container in the refrigerator for up to three days. Note that the texture of the dough might become slightly denser upon refrigeration. To refresh them, you can gently warm them in an oven for a few minutes before serving. Avoid freezing the finished buns, as the cream filling tends to separate when thawed, ruining the texture and overall eating experience. Always consume within the suggested timeframe for optimal flavor.
Can I substitute the pastry cream filling with other sweet options?
Absolutely! While classic fastelavnsboller traditionally feature crème pâtissière, many bakers love to experiment. Excellent alternatives include thick apple butter, a rich raspberry or cherry preserve, or even a robust almond paste (marzipan). Ensure your alternative filling is thick enough not to run out during baking. If using jam, choose a high-pectin variety or reduce it slightly beforehand to prevent leakage. This keeps the structure of the buns intact and makes for an equally delicious treat, adapting the recipe to your preferred fruit flavors.
What is the difference between these pastries and standard breakfast rolls?
The key differentiator lies in the enrichment and preparation. Standard breakfast rolls are often lean, simple yeast breads intended for daily consumption. Danish Carnival Buns, however, feature a highly enriched dough—packed with butter, egg, and warm spices like cardamom—that is then filled with a velvety, rich custard and glazed. This elevated preparation transforms them from a simple bread into a decadent, holiday-specific pastry, making them a true indulgence meant specifically for the Fastelavn festivities.
My dough seems heavy; what typically causes dense Danish festive buns?
Dense dough is usually a sign that the yeast was not fully activated or that you incorporated too much flour during kneading. Ensure your milk temperature is warm, not hot, as excessive heat kills the yeast. If kneading by hand, resist the urge to add cup after cup of flour; the dough should be slightly sticky before its first rise. Also, verify that your baking powder or yeast is fresh, as expired leavening agents dramatically reduce the dough’s ability to rise and create that signature airy texture vital to successful Danish Carnival Buns.
Leave a Comment