
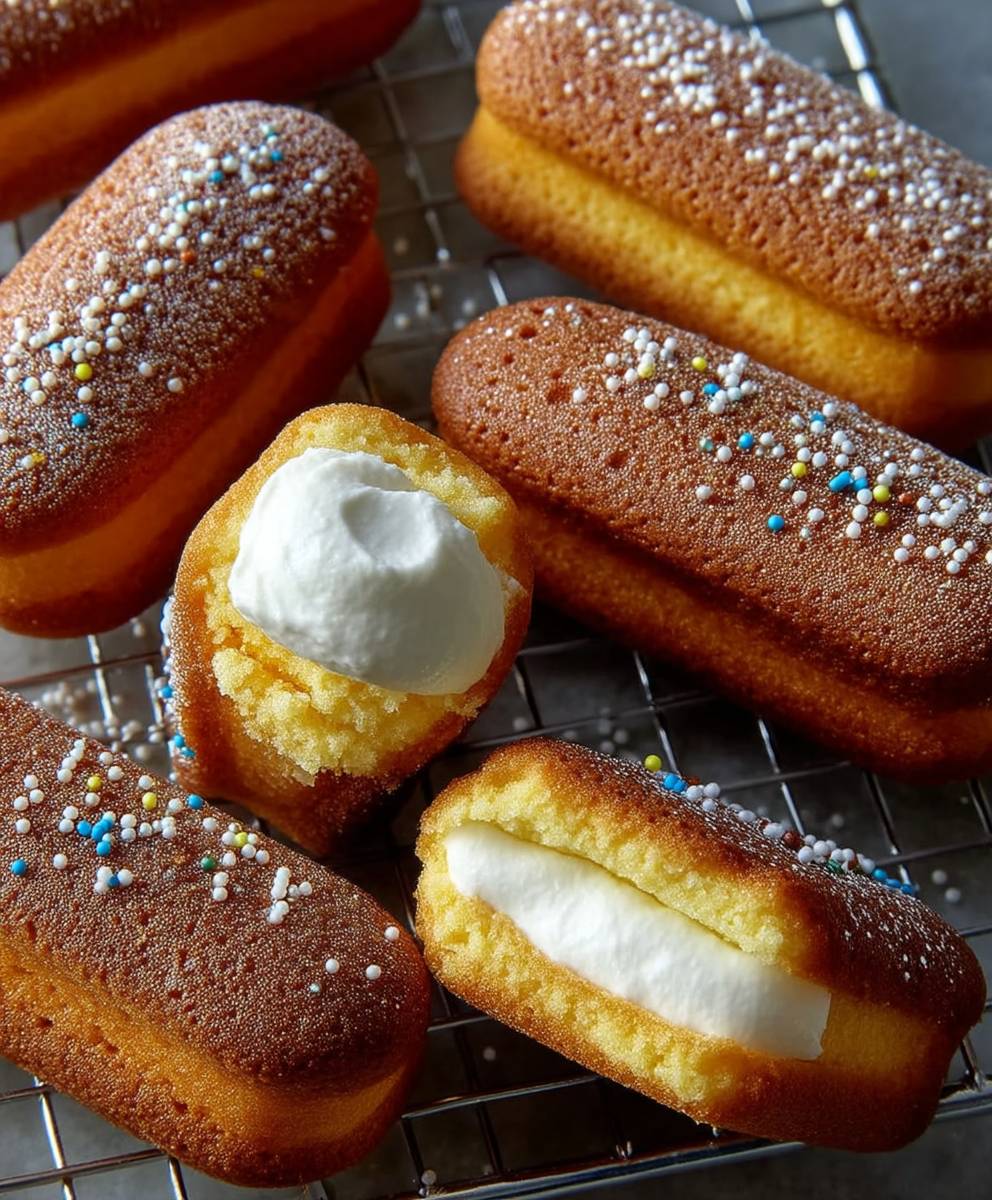
Homemade Twinkies Treats: A Nostalgic Delight
Homemade Twinkies Treats are a delightful way to bring a taste of nostalgia into your kitchen. These iconic cream-filled sponge cakes have been a beloved snack for generations, and making them from scratch allows you to experience their soft, airy texture and rich flavor like never before. The history of Twinkies dates back to the 1930s, when they were first created as a way to utilize leftover ingredients. Over the years, they have become a symbol of American snack culture, cherished for their sweet cream filling and golden exterior.
People love Homemade Twinkies Treats not just for their delicious taste, but also for the convenience they offer. With a few simple ingredients, you can whip up a batch that rivals the store-bought version, all while knowing exactly what goes into them. The combination of a light sponge cake and a luscious cream filling creates a satisfying treat that is perfect for any occasion. Whether you’re enjoying them with a cup of coffee or sharing them at a gathering, these Homemade Twinkies Treats are sure to bring smiles and sweet memories to everyone who tries them.
Ingredients:
- 1 ½ cups all-purpose flour
- 1 cup granulated sugar
- 1 ½ teaspoons baking powder
- ½ teaspoon salt
- ½ cup unsalted butter, softened
- 3 large eggs
- 1 teaspoon vanilla extract
- ½ cup whole milk
- 1 cup heavy cream
- 2 tablespoons powdered sugar
- 1 teaspoon vanilla extract (for filling)
- 1 tablespoon vegetable shortening (for coating)
Preparing the Batter
- Preheat your oven to 350°F (175°C). This ensures that the oven is hot enough to give your Twinkies that perfect golden color.
- In a large mixing bowl, combine the all-purpose flour, granulated sugar, baking powder, and salt. Whisk these dry ingredients together until they are well mixed.
- Add the softened butter to the dry ingredients. Using an electric mixer, beat the mixture on medium speed until it becomes light and fluffy, which should take about 2-3 minutes.
- Next, add the eggs one at a time, mixing well after each addition. This helps to incorporate air into the batter, making it light and airy.
- Pour in the vanilla extract and mix until combined.
- Gradually add the whole milk to the batter, mixing on low speed until everything is well combined. Be careful not to overmix; you want a smooth batter without lumps.
Preparing the Twinkie Molds
- While the batter is resting, prepare your Twinkie molds. If you don’t have a Twinkie pan, you can use a muffin tin or make your own molds using aluminum foil.
- Grease the molds generously with cooking spray or butter to prevent sticking. If you’re using a muffin tin, fill each cup about halfway with batter.
Baking the Twinkies
- Once your molds are ready, carefully pour the batter into each mold, filling them about ¾ full. This allows room for the cakes to rise without overflowing.
- Place the filled molds in the preheated oven and bake for 15-20 minutes, or until the tops are golden brown and a toothpick inserted into the center comes out clean.
- Once baked, remove the molds from the oven and let them cool in the pan for about 5 minutes. Then, gently remove the Twinkies from the molds and transfer them to a wire rack to cool completely.
Preparing the Cream Filling
- While the Twinkies are cooling, it’s time to prepare the cream filling. In a mixing bowl, combine the heavy cream and powdered sugar.
- Using an electric mixer, whip the cream on medium-high speed until stiff peaks form. This should take about 3-5 minutes. Be careful not to overwhip, as it can turn into butter.
- Once the cream is whipped, gently fold in the vanilla extract. This adds a lovely flavor to your filling.
Assembling the Twinkies
- Once the Twinkies have cooled completely, it’s time to fill them. Using a small knife, carefully cut a slit in the side of each Twinkie. This will create a pocket for the cream filling.
- Using a piping bag fitted with a round tip, fill each Twinkie with the whipped cream filling. If you don’t have a piping bag, you can use a zip-top bag with a corner snipped off.
- After filling, gently press the sides of the Twinkies together to seal them. This will help keep the filling inside.
Coating the Twinkies
- To give your Twinkies that classic look, melt the vegetable shortening in a small bowl. You can do this in the microwave in 30-second intervals, stirring in between until fully melted.
- Once melted, dip the top of each Twinkie into the shortening, allowing any excess to

Conclusion:
In conclusion, this Homemade Twinkies Treats recipe is a delightful way to bring a classic favorite into your kitchen. Not only do these treats capture the nostalgic flavor of the original, but they also allow you to customize the ingredients to suit your taste. The light, fluffy cake paired with the creamy filling creates a perfect balance that is sure to impress both kids and adults alike. Whether you’re hosting a party, looking for a fun baking project, or simply craving a sweet snack, these homemade Twinkies are a must-try!
For serving suggestions, consider pairing your homemade Twinkies with a scoop of vanilla ice cream or a drizzle of chocolate sauce for an indulgent dessert. You can also dust them with powdered sugar for a touch of elegance or serve them alongside fresh berries for a refreshing contrast. If you’re feeling adventurous, try adding different flavors to the filling, such as chocolate, strawberry, or even a hint of coffee for a unique twist. The possibilities are endless, and each variation can bring a new experience to your taste buds!
I encourage you to give this Homemade Twinkies Treats recipe a try. It’s a fun and rewarding baking experience that will fill your home with delightful aromas and create sweet memories. Once you’ve made your batch, I would love to hear about your experience! Did you stick to the classic recipe, or did you experiment with your own flavors? Share your thoughts and any tips you discovered along the way. You can even snap a picture of your delicious creations and share them on social media—don’t forget to tag your friends and inspire them to join in on the fun!
So, roll up your sleeves, gather your ingredients, and let’s get baking! I promise you won’t regret making these homemade Twinkies. They are not just a treat; they are a celebration of creativity and flavor that you can enjoy with family and friends. Happy baking!
Homemade Twinkies Treats: Easy Recipe for Delicious Snacks
Enjoy the nostalgic taste of homemade Twinkies, featuring soft sponge cakes filled with creamy whipped filling and a classic coating. Perfect for satisfying your sweet tooth or as a delightful dessert!
Ingredients
- 1 ½ cups all-purpose flour
- 1 cup granulated sugar
- 1 ½ teaspoons baking powder
- ½ teaspoon salt
- ½ cup unsalted butter, softened
- 3 large eggs
- 1 teaspoon vanilla extract
- ½ cup whole milk
- 1 cup heavy cream
- 2 tablespoons powdered sugar
- 1 teaspoon vanilla extract (for filling)
- 1 tablespoon vegetable shortening (for coating)
Instructions
- Preheat your oven to 350°F (175°C).
- In a large mixing bowl, combine the all-purpose flour, granulated sugar, baking powder, and salt. Whisk until well mixed.
- Add the softened butter and beat on medium speed until light and fluffy (2-3 minutes).
- Add eggs one at a time, mixing well after each addition.
- Pour in the vanilla extract and mix until combined.
- Gradually add the whole milk, mixing on low speed until smooth.
- Prepare your Twinkie molds by greasing them generously with cooking spray or butter.
- If using a muffin tin, fill each cup about halfway with batter.
- Pour the batter into each mold, filling them about ¾ full.
- Bake for 15-20 minutes, or until golden brown and a toothpick comes out clean.
- Let cool in the pan for 5 minutes, then transfer to a wire rack to cool completely.
- In a mixing bowl, combine heavy cream and powdered sugar.
- Whip on medium-high speed until stiff peaks form (3-5 minutes).
- Gently fold in the vanilla extract.
- Once cooled, cut a slit in the side of each Twinkie to create a pocket.
- Fill each Twinkie with the whipped cream using a piping bag or zip-top bag.
- Press the sides together to seal.
- Melt the vegetable shortening in a small bowl.
- Dip the top of each Twinkie into the melted shortening, allowing excess to drip off.
- Place on a wire rack to set for a few minutes before serving.
Notes
- Ensure the Twinkies are completely cooled before filling to prevent the cream from melting.
- You can customize the filling by adding different flavors or extracts.
- Store any leftovers in an airtight container in the refrigerator.

Leave a Comment