
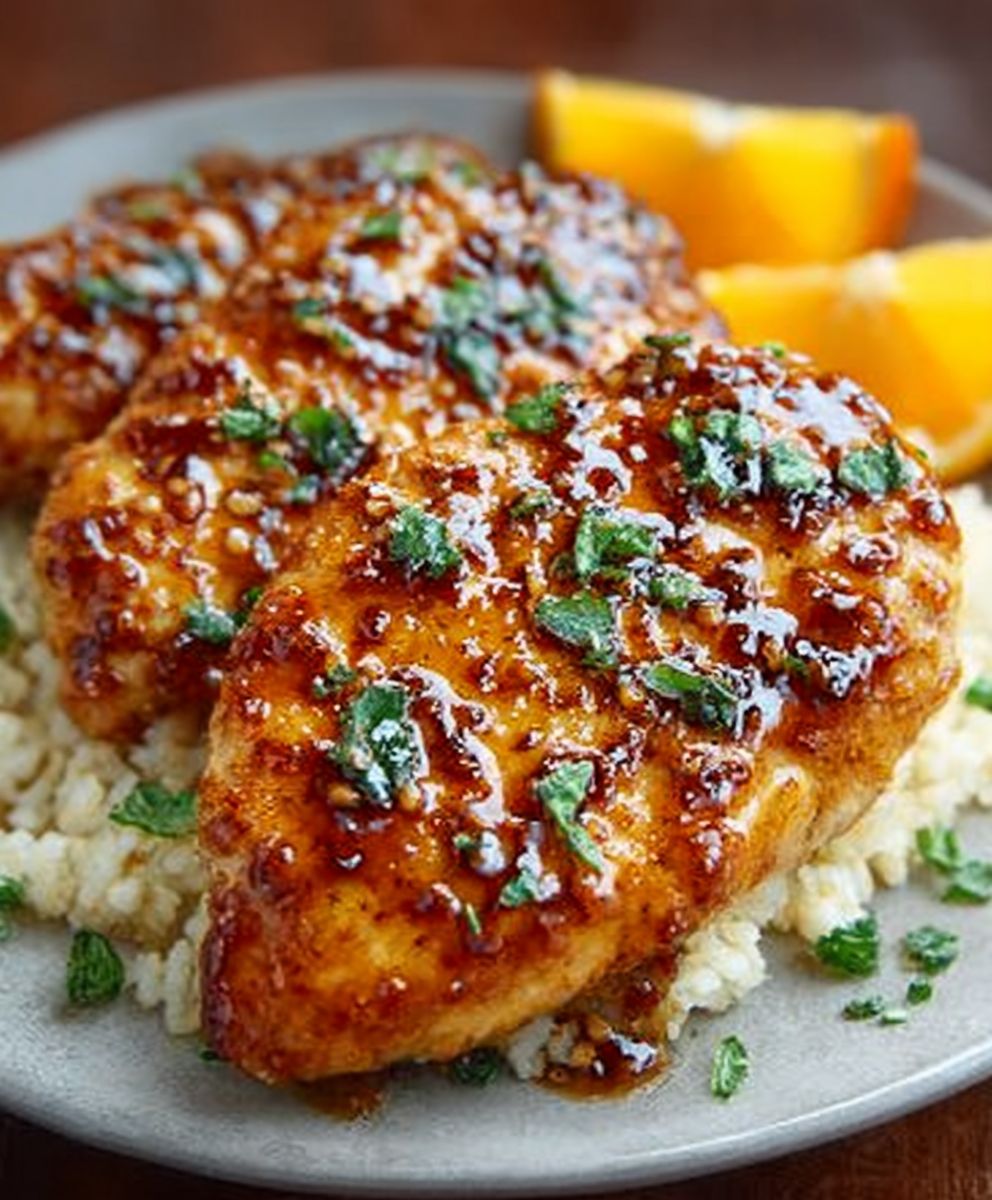
The sticky sweet aroma of caramelized honey mingled with sharp garlic can rescue any dreary weeknight dinner. Forget complicated techniques; we’re aiming for maximum flavor with minimum fuss, resulting in the most succulentHoney Garlic Chicken Breastsyou’ve ever tasted.
This isn’t just a meal; it’s a personality transformation for your poultry, turning humble chicken into a glossy, irresistible centerpiece. Prepare for silence at the dinner table—the kind that only happens when food is truly magnificent.
- This simple recipe demands minimal prep time, utilizing everyday pantry staples for fast weeknight execution without sacrificing complexity.
- The sauce features a perfect balance of sweet honey and savory roasted garlic, creating a deeply satisfying and universally loved flavor profile.
- Achieve beautifully caramelized, glossy chicken that looks professionally prepared but requires shockingly little effort in your own kitchen.
- These flavorful fillets pair wonderfully with everything from simple steamed greens to creamy mashed potatoes, maximizing meal versatility for busy schedules.
The Culinary Salvation of the Weeknight Dinner
Let’s be honest: after a long day of pretending to be functional adults, the idea of cooking anything that requires more than two steps feels like a cruel joke. I used to stare into the fridge, paralyzed by options, before inevitably ordering expensive, slightly soggy takeout. My chicken dishes often fell into one of two camps: dry and sad, or flavorless and disappointing. It was a vicious cycle of culinary mediocrity until I cracked the code on quick, high-impact flavor. That code, my friends, is the simple yet profound magic ofHoney Garlic Chicken Breasts.
This recipe is my personal emergency parachute. It’s the dish I whip out when I have twenty minutes and zero motivation but still want to feel like a domestic superstar. The key to its success is harnessing the power of a sweet, acidic, and savory glaze that clings to the chicken like a culinary hug. We are maximizing caramelization and moisture retention, ensuring that every bite is tender, juicy, and profoundly flavorful. You deserve chicken that shines, not chicken that makes you sigh.
The Magic of the Marinade: Building Deep Flavor
A great chicken breast doesn’t start cooking until it’s been properly introduced to its flavor friends. While you can certainly get away with a quick toss, giving your chicken pieces a short soak in the marinade truly elevates this dish. Think of the marinade as a spa day for the chicken; it tenderizes, hydrates, and infuses flavor deep within the meat structure. For this specific recipe, the marinade isn’t overly complicated—it relies heavily on the triumvirate of savory soy sauce (or tamari), zesty cider vinegar, and, of course, fresh garlic. Many people mistakenly believe the longer the marinade, the better, but for poultry, especially lean cuts like breasts, 30 minutes is often plenty to achieve the desired effect without compromising the texture.
When selecting your chicken breasts, look for evenly sized fillets. If they are very thick, a quick, light pounding with a meat mallet (or the bottom of a heavy skillet, if you’re feeling primitive) ensures uniform thickness. This simple step is vital for ensuring that all pieces finish cooking simultaneously. There’s nothing worse than serving a plate where one side is perfectly cooked and the other side is still pink. Uniformity is the unsung hero of home cooking. Once seasoned, the chicken is ready to embrace the glorious glaze that defines the dish.
Achieving Peak Glaze Perfection
The transformation from liquid mixture to glossy, sticky glaze is where the real culinary performance takes place. This isn’t a subtle sauce; it’s a bold, unapologetic coating designed to impress. The magic lies in the high heat reaction between the natural sugars of the honey and the savory elements. As the liquid reduces, it concentrates the flavors, thickening into a beautiful lacquer.
When you start cooking the chicken, ensure your pan—whether it’s a cast-iron skillet or a heavy nonstick version—is sufficiently hot. Placing the chicken onto a cold pan is the quickest way to end up with grey, sad poultry. We are aiming for a gorgeous golden-brown sear right out of the gate. Sear the chicken for several minutes on each side until nicely browned before introducing the glaze. If you add the glaze too early, the honey will burn before the chicken is cooked through. Patience here pays off in layers of color and texture.
Sauce Reduction Secrets for Sticky Results
Once the chicken has a good sear, the sauce mixture—composed primarily of honey, garlic, a touch of brown sugar for depth, and broth—goes into the pan. This is where you monitor the heat closely. You want a robust simmer, not a raging boil, which allows the liquid to slowly evaporate and thicken. The residual heat from the pan and the chicken will help bind the sauce. A pro tip: if you find the sauce isn’t thickening quite enough, a tiny slurry of cornstarch and cold water (about one teaspoon of cornstarch mixed with one tablespoon of water) swirled into the sauce during the final minute will instantly elevate it to glossy, clingy perfection. This simple technique ensures every piece of theHoney Garlic Chicken Breastsis enveloped in that irresistible, sticky coating.
Don’t be afraid to spoon the glaze over the chicken repeatedly as it reduces. This basting action not only ensures even coating but also helps the sugars caramelize directly onto the chicken’s surface, building up a beautiful depth of flavor. When the sauce is thick enough to coat the back of a spoon and the internal temperature of the chicken reaches 165°F (74°C), you are ready for the grand finale. Let the chicken rest for five minutes before serving. Resting allows the juices, which have been pushed toward the center by the heat, to redistribute throughout the meat, guaranteeing maximum tenderness.
Pairing and Presentation: Sides That Sing
While the Honey Garlic Chicken Breasts are undoubtedly the star of the show, even a superstar needs a strong supporting cast. Choosing the right sides is essential for balancing the dish’s intense sweet and savory profile. Since the glaze is rich, bright, acidic sides work wonderfully to cut through that sweetness. Steamed green beans tossed lightly with lemon and slivered almonds, or a crunchy cucumber and red onion salad dressed with rice vinegar, are fantastic choices.
If you prefer heartier fare, serving this chicken over fluffy white rice is a classic choice, as the rice soaks up the extra glaze—a truly luxurious experience. Alternatively, garlic mashed potatoes provide a comforting base. For a healthier, low-carb option, consider roasted broccoli florets seasoned lightly with salt and pepper. The key is to select sides that don’t compete with the chicken but instead offer a textural contrast or a refreshing counterpoint. Garnish the final plate liberally with fresh chopped scallions or a sprinkle of toasted sesame seeds for an immediate visual upgrade. Presentation matters, even on a rushed Tuesday night.
Ingredients for Honey Garlic Chicken Breasts
Here’s what you’ll need to make this delicious dish:
- Boneless, Skinless Chicken BreastsSelect four similarly sized fillets to ensure even cooking and juicy results.
- Soy Sauce or TamariThis provides the essential salty, umami base for both the marinade and the final glaze mixture.
- HoneyUse a good quality liquid honey; it provides the rich sweetness necessary for the signature sticky glaze texture.
- Fresh GarlicChopped or minced garlic is non-negotiable, offering a pungent, aromatic punch that complements the sweetness of the honey.
- Apple Cider VinegarA splash of vinegar introduces necessary acidity, preventing the glaze from becoming overly sweet and helping to tenderize the chicken.
- Chicken BrothUse low-sodium broth to thin the glaze slightly and add liquid necessary for reduction without adding excessive saltiness.
- Brown SugarA small amount adds complexity and depth of flavor, enhancing the caramelization process during reduction.
- CornstarchUsed as an optional thickening agent for the final sauce if a very viscous glaze is desired.
- Dried Ginger PowderThis spice adds a subtle warmth and aromatic lift, rounding out the savory elements of the dish beautifully.
The full ingredients list, including measurements, is provided in the recipe card directly below.
How to Make Honey Garlic Chicken Breasts
Follow these simple steps to prepare this delicious dish:
Step 1: Preparation and Initial Seasoning
Pat the chicken breasts completely dry using paper towels. If the chicken pieces are very thick, gently pound them to achieve a uniform thickness of about three-quarters of an inch. Season both sides lightly with salt, black pepper, and a pinch of paprika for color.
Step 2: Whisk the Glaze Ingredients
In a medium bowl, whisk together the soy sauce, honey, apple cider vinegar, brown sugar, minced garlic, ginger powder, and chicken broth until the honey is fully incorporated. Reserve about three tablespoons of this mixture in a separate small dish to use later for basting.
Step 3: Sear the Chicken
Heat a large skillet—cast iron works excellently—over medium-high heat with a little oil. Once the oil is shimmering, carefully place the seasoned chicken breasts into the hot pan. Sear the chicken for 3 to 4 minutes per side, ensuring a deep golden-brown crust develops before flipping.
Step 4: Introduce and Reduce the Sauce
Pour the remaining honey garlic glaze mixture over the chicken in the skillet. Reduce the heat to medium-low to maintain a gentle simmer. Allow the sauce to bubble and reduce for about 8 to 12 minutes, turning the chicken every few minutes to ensure it is evenly coated.
Step 5: Achieve the Perfect Glaze Consistency
Continue cooking until the sauce has thickened significantly and become glossy and sticky, adhering well to the chicken. Ensure the internal temperature of the chicken reaches 165°F (74°C) using a meat thermometer. If the sauce is still too thin, mix a teaspoon of cornstarch with a tablespoon of cold water, pour it into the simmering sauce, and stir until thickened.
Step 6: Rest and Garnish
Remove the chicken from the pan and let it rest on a cutting board for five minutes. While the chicken rests, stir the reserved three tablespoons of sauce into the pan’s remaining glaze to enhance freshness. Transfer to plates and drizzle with the thickened sauce, garnishing with fresh parsley or green onions for the perfect finishing touch.
The culinary calendar for most home cooks is a constant battle between speed and satisfaction. We start the week armed with ambitious meal plans, promising ourselves gourmet efficiency. By Wednesday, however, that zeal has usually evaporated, replaced by the deep, existential dread of “What am I going to cook now?” We’ve all been there: staring into the refrigerator abyss, convincing ourselves that yogurt and a single, forlorn cucumber count as a balanced meal. That is precisely why we need heroes in the kitchen—recipes so robust, so flavorful, and so gloriously simple that they rescue us from the brink of takeout temptation.
Enter the true champion of weeknight simplicity: the perfect glazed chicken breast. This recipe isn’t just about throwing a few ingredients together; it’s about harnessing the magical transformation that occurs when sweet honey meets pungent garlic and bright ginger. The resulting sticky glaze clings lovingly to the chicken, creating a dish so deceptively delicious, you will feel like you pulled off a culinary heist. Forget complex marinades and lengthy ingredient lists; we are talking about five key ingredients that come together in less time than it takes to decide what to stream on television tonight. If you are ready to revolutionize your dinner rotation with minimal effort and maximum flavor, keep reading. This is the meal that silence the picky eaters and makes you look like a kitchen deity.
The Accidental Discovery of Sunshine on a Plate

It was 7 PM, my fridge was a barren landscape, and I was dangerously close to ordering takeout. I rummaged through the pantry and found the sticky essentials. Necessity, they say, is the mother of invention, but in my case, it was the mother of the ultimate Honey Garlic Chicken Breasts, a dish that tasted suspiciously like a successful dinner.
The true power of this sticky glazed chicken lies in the contrast: the savory, perfectly seared protein playing against the caramelized sweetness of the sauce. It is a flavor profile that works across cultures and palates. While some complex dishes demand obscure techniques, this recipe champions straightforward cooking methods. We are building flavor layers quickly, starting with the searing of the chicken, which is absolutely vital for developing that satisfying, golden-brown crust. This crust acts like an anchor for the intense glaze we introduce later. Remember, color equals flavor, and we want deep, gorgeous color on these fillets.
The Essential Ingredients for Maximum Glaze
Before we even think about turning on the stove, we need to gather our troops. Quality ingredients make a huge difference here, especially since the ingredient list is so short. Do not skimp on the garlic; the fresh, intense heat of minced garlic is non-negotiable for achieving that classic savory punch.
- Chicken Breasts:Four medium-sized, boneless, skinless fillets.
- The Sweetener:½ cup pure honey (liquid gold, truly).
- The Heat:4 cloves garlic, minced, and 1 teaspoon fresh ginger, grated.
- The Base:¼ cup low-sodium soy sauce or tamari.
- The Tang:1 tablespoon rice vinegar.
- Oil:2 tablespoons neutral cooking oil (like canola or avocado oil) for searing.
- Garnish (Optional):Sesame seeds and sliced green onions.
If you are watching sodium intake, swapping traditional soy sauce for tamari or coconut aminos maintains the rich umami flavor without overdoing the salt content. The rice vinegar provides a much-needed acidic balance, cutting through the richness of the honey and preventing the dish from tasting overly saccharine. This combination—sweet, salty, pungent, and tart—is the holy quartet of flavor that guarantees success every time you prepare this quick chicken dish.
Perfecting the Cooking Process
Efficiency is key when hunger strikes. Sear the chicken breasts first to lock in moisture and color, creating that gorgeous crust. While they finish cooking, rapidly whisk the simple glaze together so it’s ready to pour and reduce into a thick, sticky coating.
Searing the Chicken for the Ultimate Crust
The first step is always preparation. Slice the thicker ends of the chicken breasts horizontally to create cutlets of uniform thickness. This ensures they cook evenly and rapidly—nobody wants one end of the chicken dry while the other remains suspiciously pink. Pat the chicken completely dry using paper towels. This crucial step removes surface moisture, allowing the heat to directly interact with the protein, leading to a quick, beautiful sear rather than a sad, steamy situation.
Heat your oil in a large skillet over medium-high heat until it shimmers. Place the chicken breasts in the hot pan, ensuring you do not overcrowd the pan, which would lower the temperature. Sear the chicken for approximately 4 to 5 minutes per side until deeply golden brown and cooked through. Remove the cooked chicken and set it aside on a plate. Do not clean the pan! Those little caramelized bits stuck to the bottom are flavor reservoirs, ready to mingle with our sauce.
Creating the Irresistible Glaze
Now for the fun part: making the glaze. Reduce the heat under your skillet to medium-low. Add the minced garlic and grated ginger to the pan drippings and sauté them for about 60 seconds until they become fragrant. Be careful not to burn the garlic, as burnt garlic turns acrid and will ruin the delicate balance of the sauce.
Once the aromatics are softened, whisk in the soy sauce (or tamari), honey, and rice vinegar. Bring the mixture to a gentle simmer. This sauce requires patience for the next few minutes. Allow it to bubble and reduce slightly, stirring occasionally. As the water evaporates, the honey thickens the sauce, creating that beautiful, glossy texture we are aiming for. This reduction process usually takes about 3 to 5 minutes. You will know it is ready when it coats the back of a spoon thickly.
Return the cooked chicken breasts to the pan and spoon the thick, rich glaze over them, coating every surface. Let the chicken simmer in the sauce for one minute, just long enough for the sticky coating to fully adhere and reheat the meat. Garnish with a sprinkle of toasted sesame seeds and thinly sliced green onions for a pop of color and freshness. Serve immediately over rice or alongside a simple stir-fried vegetable medley for a complete, satisfying meal.
Add Your Touch
You can easily turn this into a spicy affair by adding a pinch of chili flakes to the glaze. For a deeper, earthier profile, substitute the traditional soy base with coconut aminos. Serving over fluffy jasmine rice or roasted broccoli elevates this simple meal instantly.
This recipe is highly adaptable. If you prefer thigh meat, use boneless, skinless chicken thighs and increase the cooking time by a few minutes until they reach an internal temperature of 165°F (74°C). For a full sheet pan meal, toss broccoli florets or diced bell peppers with a little oil and salt, roast them for 15 minutes before adding the seared chicken, and then pour the glaze over everything and finish baking for the final five minutes. This transforms the dish into an even more effortless one-pan wonder. If you want a thicker, almost caramel-like coating, whisk half a teaspoon of cornstarch mixed with one teaspoon of cold water into the glaze right before you reintroduce the chicken; this guarantees an ultra-thick finish.
Storing & Reheating
Store leftovers in an airtight container for up to three days in the refrigerator; the sauce actually thickens and improves overnight! Reheat gently in a pan over low heat, adding a splash of water or broth to loosen the glaze if it has become too sticky when cold.
Expert Tips for Perfect Glazed Chicken
- Always pat the chicken dry before searing; moisture prevents that beautiful golden-brown crust we all crave, leading to steaming instead of true caramelization.
- When making the glaze, let it reduce for at least three minutes after adding it to the pan. This ensures maximum thickness and a glossy, professional finish.
- Use freshly grated ginger instead of powdered ginger; the pungent, bright flavor of fresh root elevates the entire dish and adds necessary zestiness.
My usually finicky nephew took one bite of this glorious glaze and declared, “Auntie, this is the only way I will eat chicken now.” That’s high praise coming from a connoisseur of dinosaur-shaped nuggets.
Conclusion for Honey Garlic Chicken Breasts
This simple weeknight savior proves that you do not need complicated techniques or exotic ingredients to create something truly spectacular. The brilliance of Honey Garlic Chicken Breasts lies in its speed, flavor depth, and universal appeal. Whether you are battling a hectic Tuesday or hosting a casual dinner, this recipe delivers maximum flavor payoff for minimal effort. Master the sear, respect the glaze, and prepare to have your dinner rotation permanently upgraded. Say goodbye to dull chicken dinners forever!

Leave a Comment