
When the air turns crisp and thoughts turn to sugar, nothing transports me back home faster than this sticky, glorious mess. This is the ultimate holiday confection, demanding a little elbow grease and a whole lot of patience, often ending with a light dusting of powdered sugar on the ceiling.
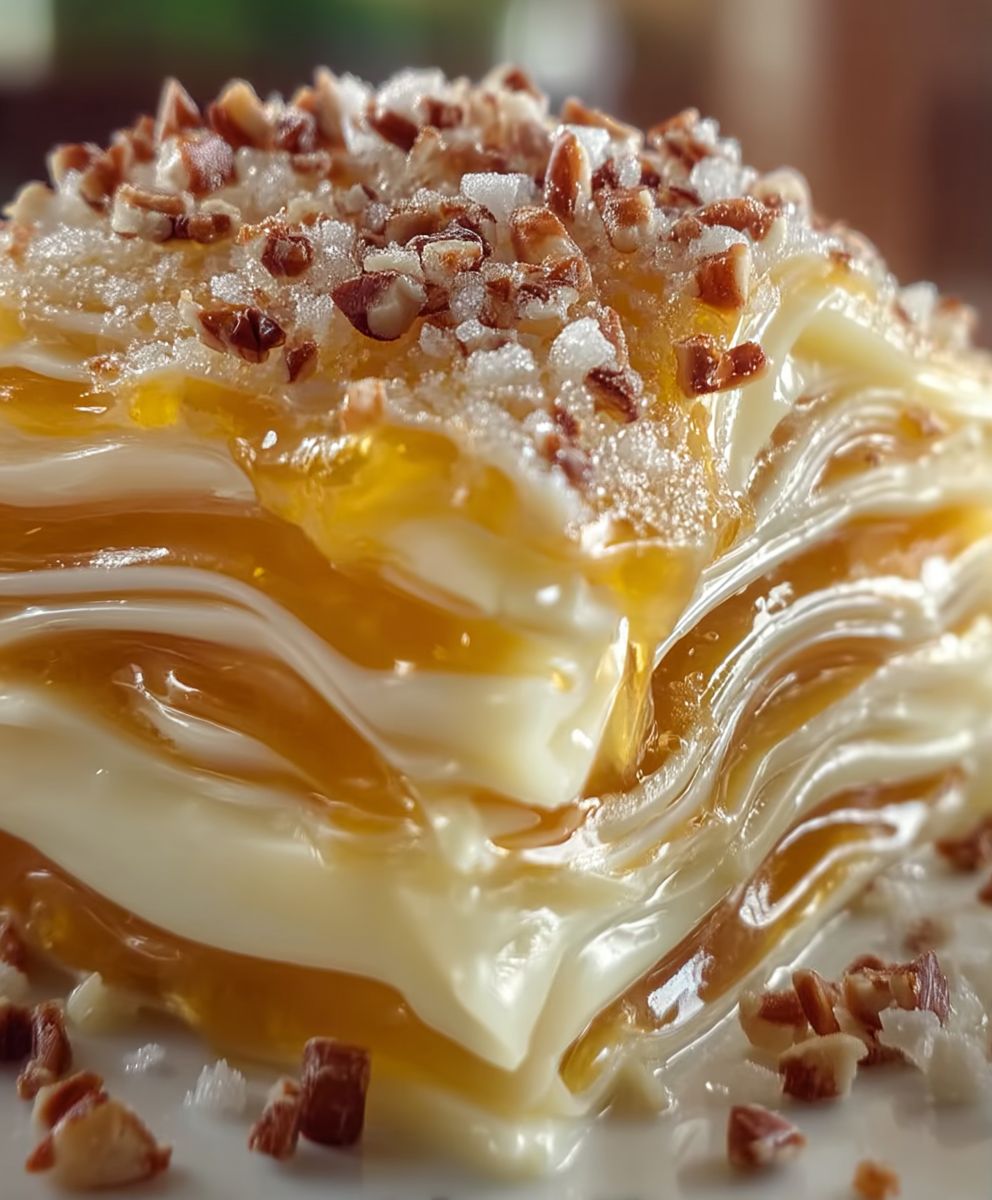
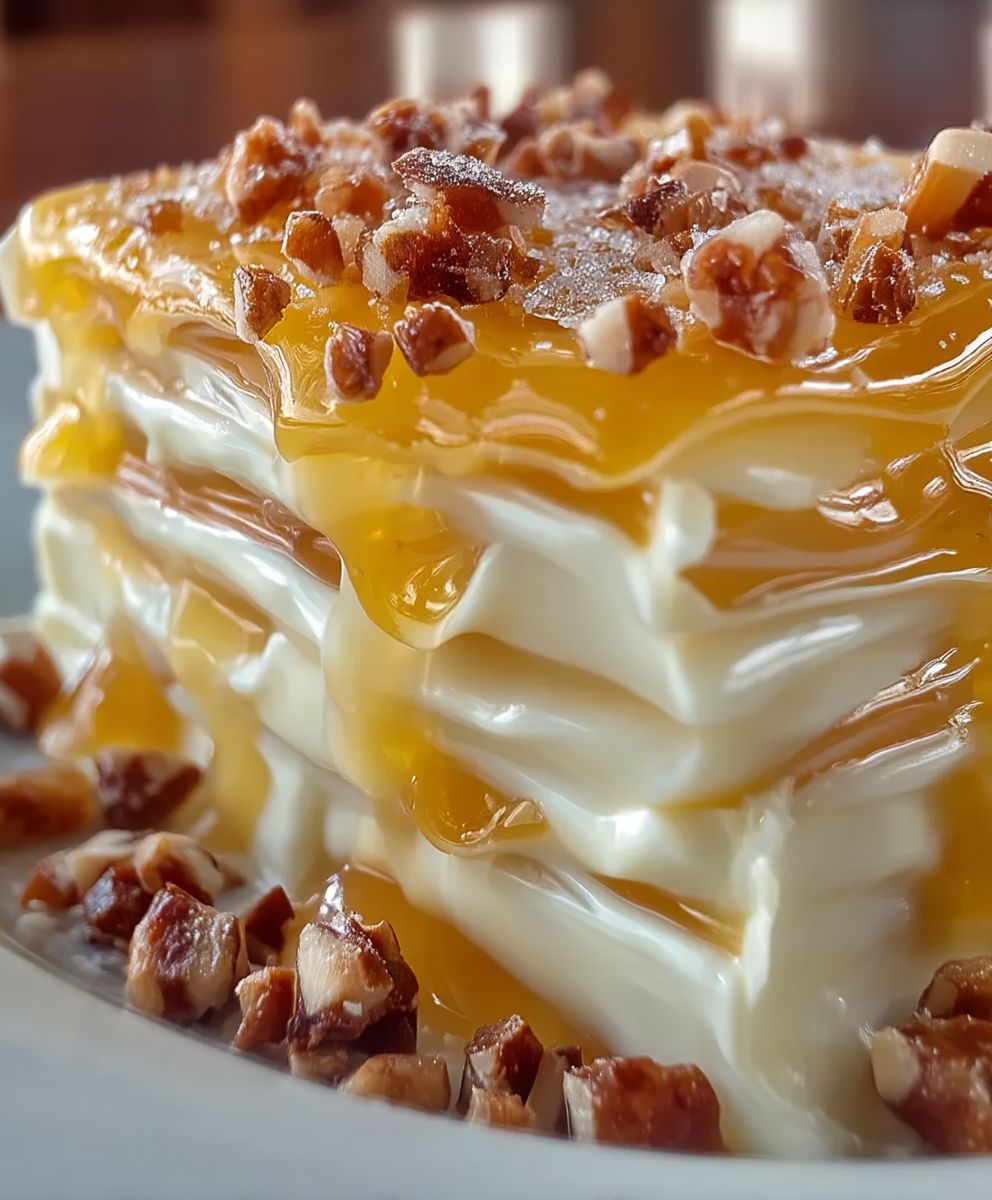
Forget delicate petit fours; we are talking about the glorious chew and melt-in-your-mouth sweetness ofKentucky Cream Pull Candy: A Sweet Tradition You Need to Try—the kind of sweet that earns its legendary status through hard work and family lore.
- This simple recipe requires only basic pantry staples, making it surprisingly accessible even for beginner confectioners looking for a rewarding holiday project.
- The flavor profile is a rich, buttery vanilla essence that finishes with a delightful caramel note, providing unparalleled nostalgic comfort with every bite.
- The visual appeal comes from the mesmerizing transformation as the candy stretches into ribbons of gleaming, pearlescent white perfection during the strenuous pulling process.
- Versatility shines as this candy makes an exquisite homemade gift, serves beautifully as a dessert platter centerpiece, or provides a perfect afternoon energy boost for your inner child.
The Hilarious History of Pull Candy and Why You Should Embrace the Sticky Mess
There are recipes you make, and then there are recipes that make memories. This is firmly the latter. Pull candy, in various regional forms, has been a staple of Southern Christmases and gatherings for centuries. It’s not just a candy; it’s an interactive sport, often resulting in sticky hands, competitive stretching, and perhaps a mild family argument over who gets to hold the end that pulls the cleanest. Before the days of instant gratification and microwave mug cakes, if you wanted something chewy and delicious, you had to physically work for it. Imagine a 19th-century version of mandatory family exercise disguised as dessert—that’s pulling candy.
My grandmother, a woman whose kitchen was less a place of cooking and more a high-stakes culinary laboratory, used to tell me that if you weren’t covered head-to-toe in a fine sheen of sugar dust by the end, you hadn’t pulled hard enough. She swore the air itself was an ingredient, specifically the cold, dry winter air, which is why making this treat in the humid summer months is strictly forbidden unless you enjoy creating a sugary puddle of despair. This candy is truly about the alchemy of simple ingredients transforming under heat and air pressure into something sublime, white, and surprisingly creamy despite the absence of actual cream.
The Importance of the Weather Forecast (Humidity is the Enemy!)
When attemptingKentucky Cream Pull Candy: A Sweet Tradition You Need to Try, you must consult your local meteorologist before you consult your recipe card. Seriously. Humidity is the nemesis of all cooked sugar. If the air is thick and damp, the finished candy will never set properly; it will weep, stick to everything you love, and eventually turn into a sad, gooey mess that requires power tools to remove from the counter. The ideal environment for pulling candy is a cold, dry winter day. If you live in a tropical climate, you may need to wait until the deepest part of winter and crank your air conditioning down until your kitchen resembles a meat locker. This isn’t just a suggestion; it is a critical warning from generations of sticky-fingered candy makers.
Once you’ve confirmed the humidity is under 40% (ideally much lower), you can move on to the actual cooking. The process is straightforward: boil sugar, butter, and water until it reaches a specific temperature, pour it out, and then wrestle it into submission. It sounds simple, but this recipe requires respect for thermodynamics. You are essentially creating glass, only to soften it just enough to stretch and fold. This stretching process incorporates air bubbles, which is what turns the color from a translucent yellow to that beautiful, opaque white or pearl color. The more you pull, the whiter and creamier it gets. The fun, slightly painful part is finding someone else to pull with you—it’s much easier to stretch when you have two sets of hands.
Why Temperature Matters More Than Your Opinion
When cooking candy, a reliable candy thermometer is not optional; it is mandatory. You cannot wing this, and checking if it “looks about right” will result in either brittle shards that break your teeth or a soft, spoonable caramel that, while delicious, is definitely not pull candy. We are aiming for the “hard ball” stage, specifically around 265°F to 270°F (129°C to 132°C). Hitting that target range ensures the candy is cooked enough to become firm but retains enough flexibility to be pulled without snapping immediately.
If you cook it too long, you end up with rock-hard shards of glass suitable only for confusing dentists. If you undercook it, it stays sticky, soft, and sad, refusing to hold its shape. A simple kitchen hack is to always use a clean, heavy-bottomed saucepan to prevent scorching and ensure even heat distribution. Also, resist the urge to stir the mixture once the sugar dissolves and the boiling begins. Stirring encourages crystallization, which is the enemy of smooth, glossy candy. You want that sugar mixture to concentrate silently and efficiently, turning into glorious liquid gold that will soon become the perfect foundation for your candy-pulling adventure.
Preparing your surface is also key. Whether you are using a marble slab, a heavy baking sheet, or specialized silicone mats, make sure it is meticulously buttered or oiled. The molten sugar will be incredibly hot—reaching well over 250°F—so safety first! You will need enough space to pour the entire batch without fear of it running onto the floor. Once poured, this recipe moves fast, transitioning from liquid lava to manageable dough in mere minutes. This quick transformation is part of the magic, and part of the reason this old-fashioned treat is still so beloved today.
Ingredients for Kentucky Cream Pull Candy: A Sweet Tradition You Need to Try
Here’s what you’ll need to make this delicious dish:
- Granulated SugarThis is the backbone of the candy. Use standard granulated white sugar for the best structure and color consistency.
- Light Corn SyrupCrucial for preventing crystallization (turning your candy gritty) and for adding elasticity, making the candy pliable enough to pull.
- WaterNeeded to dissolve the sugar initially; ensure it is filtered or tap water to start the boiling process.
- Unsalted ButterAdds richness, depth of flavor, and essential fattiness that contributes to the candy’s ‘creamy’ mouthfeel, cut into several pieces for easy melting.
- Vanilla Bean PasteThe signature flavor of this candy; use high-quality pure vanilla bean paste for the best aroma and taste.
- Baking SodaJust a tiny amount is needed; it provides a slight leavening action and helps to aerate the cooked sugar slightly, contributing to the final soft texture.
The full ingredients list, including measurements, is provided in the recipe card directly below.
How to Make Kentucky Cream Pull Candy: A Sweet Tradition You Need to Try
Follow these simple steps to prepare this delicious dish:
-
Prepare Your Workspace and Tools
Generously grease a large, sturdy baking sheet or a clean marble slab with butter or a neutral-flavored oil. Ensure your candy thermometer is securely clamped to the side of a heavy-bottomed, 4-quart saucepan, and have the vanilla bean paste and baking soda measured and ready near the stove.
-
Cook the Sugar Mixture to Specific Temperature
In the saucepan, combine the granulated sugar, corn syrup, and water. Stir gently over medium heat until the sugar dissolves completely. Once boiling begins, stop stirring. Add the butter pieces and let the mixture boil steadily until the temperature reaches 265°F (129°C), ensuring the thermometer bulb is fully immersed but not touching the bottom of the pot. This takes approximately 15 to 25 minutes, depending on the heat level.
-
Achieve the Hard Ball Stage and Add Flavor
Once the mixture hits 265°F (129°C), remove the pot immediately from the heat. Carefully stir in the vanilla bean paste and then quickly whisk in the baking soda. The mixture will foam up dramatically; this is normal and desired as it helps aerate the candy. Work quickly but safely during this stage.
-
Pour and Cool the Candy Mass
Immediately and carefully pour the entire molten sugar mixture onto your prepared, greased surface. Do not scrape the bottom of the pan. Allow the candy to sit undisturbed for about 5 to 10 minutes until the edges firm up and cool enough to handle, but the center remains very warm and pliable (you should be able to press into it lightly without severe burning).
-
Begin the Pulling Process
Butter your hands heavily. Using a scraper or spatula, fold the edges of the candy mass toward the center until it forms a cohesive, manageable log. Now, start pulling! Stretch the candy out into a long rope, fold it back onto itself, twist it, and stretch it again. Repeat this process continuously. This introduces air, which turns the color from golden to opaque white and gives it that signature creamy texture.
-
Cut and Store the Finished Candy
Continue pulling until the candy is stiff, shiny, opaque white, and resists stretching significantly (usually 10 to 15 minutes of strenuous pulling). At this point, twist the rope tightly and use buttered scissors to cut it into 1-inch pieces. Place the pieces on parchment paper to cool and harden completely before storage. Transfer to plates and drizzle with sauce for the perfect finishing touch.
Tips and Tricks for Achieving the Perfect Pull and Texture
The pulling process is where most beginners struggle, mainly because they underestimate the amount of physical labor required. Think of it as a brief, intense arm workout. If you are struggling to pull, the candy might be too hot or too cold. If it’s snapping immediately, it cooled too much; try working it near a very low heat source (like a barely warm oven) to soften it slightly. If it’s too sticky and collapses, you need to keep pulling—the aeration process thickens the mixture.
For those who prefer a less hands-on approach, or if you simply lack a willing pulling partner, you can use a clean, well-greased metal hook attached securely to a cabinet or wall. This allows you to pull the candy against the fixed hook, stretching and folding it continuously with one set of hands. However, I highly recommend finding a partner. Pulling candy is traditionally a communal event, and it prevents one arm from receiving all the credit for your intense workout. Just ensure both parties have extremely buttered hands before starting the process, avoiding any accidental permanent attachments to the dessert.
One final, crucial step often overlooked in makingKentucky Cream Pull Candy: A Sweet Tradition You Need to Tryis the storage. Once the candy is fully cooled and hardened, it is highly susceptible to moisture. Store the pieces in an airtight container at room temperature immediately. Layer the candy pieces between sheets of wax paper to prevent sticking. Never refrigerate or freeze pull candy, as the condensation will cause it to rapidly soften and dissolve. When stored correctly in a cool, dry place, this delightful treat can last for several weeks, though in my experience, it rarely lasts longer than an afternoon once the family finds the hiding spot.
Experimenting with flavors is also half the fun. While vanilla is traditional, you can easily substitute or add other extracts, like peppermint or almond, for seasonal twists. Just remember that extracts are highly concentrated, so start small. Regardless of the flavor choice, achieving that signature velvety texture requires diligent temperature control and an enthusiastic pull. Embrace the mess, enjoy the workout, and savor the reward of this truly historic and delicious Southern confection.
The Legend of the Southern Butter Cloud
There are recipes that are delicious, and then there are recipes that stop conversations, induce sudden silences, and generally make people question all their previous dessert choices. This candy falls firmly into the latter category. Forget everything you thought you knew about confectionery; we are diving deep into a beloved Southern secret—the kind of sweet treat that makes you feel instantly nostalgic, even if you’ve never tasted it before. This isn’t just sugar and cream; this is edible velvet, stretched and folded into the lightest, creamiest texture imaginable.
The culinary landscape of Kentucky is rich, offering more than just thoroughbreds and bluegrass. It gives us this sublime, melt-in-your-mouth delight, historically reserved for special occasions but easy enough to make any Tuesday. While many recipes require specialized equipment or advanced culinary degrees, making this pull candy relies more on muscle and patience than precision machinery. It is an art form best perfected with a good sense of humor and perhaps a friend to help with the strenuous pulling stage.
The Difference Between Fudge and Fantasy
If you have ever tried classic pulled taffy, you know the chewiness. If you have eaten fudge, you know the density.Kentucky Cream Pull Candy: A Sweet Tradition You Need to Tryis neither; it exists in a luxurious middle ground. It starts dense, but through the dedicated, almost meditative process of pulling, air is incorporated, turning the sticky mass into a soft, crystalline, white fluff. The result is a candy that crumbles gently on the tongue, releasing notes of pure vanilla and rich butter. It has an unmistakable shine, like polished ivory, and a flavor that haunts you until the last piece disappears.
My first experience with this delicacy was entirely unexpected. I spent a week with my great-aunt Millie, a woman who believed measuring spoons were merely suggestions and high-speed blenders were “the devil’s tools.” She was attempting a standard chocolate fudge but realized halfway through she lacked enough cocoa powder to make it respectable. She shrugged, declared, “We’ll just pull it,” and thus changed my confectionery worldview forever.
The Accidental Discovery of Sunshine on a Plate
My grandmother first made this for me when she ran out of chocolate chips, substituting the planned fudge with this glorious, buttery cloud. It was a happy accident, proving that sometimes, desperation leads to the discovery of the most delightful treat, like the stunningKentucky Cream Pull Candy: A Sweet Tradition You Need to Try.
The Essential Ingredients for Cream Pull Candy
The beauty of this recipe lies in its simplicity. You likely have most of these items in your pantry already. Quality ingredients truly shine here, so spring for the good vanilla bean paste and the rich, full-fat dairy products.
What You Will Need
- 2 cups granulated sugar
- 1 cup light corn syrup
- 1 cup heavy cream (36% fat minimum)
- 4 tablespoons unsalted butter, cubed
- 1 teaspoon pure vanilla bean paste
- Pinch of fine sea salt
The Necessary Tools (and why you can’t skip them)
While Aunt Millie might have scoffed, a few key pieces of equipment make this process infinitely easier and safer. First, a heavy-bottomed saucepan prevents scorching, which can ruin the texture and flavor instantly. Second, and most importantly, you need a reliable candy thermometer. Eye-balling temperatures above 230°F is simply a recipe for disaster. Finally, prepare a clean, buttered marble slab or a sturdy, non-stick baking sheet for the cooling and pulling stage.
The Transformation: From Syrup to Silk
The cooking process is a thrilling ride involving high temperatures and quick decisions. Do not walk away from the stove during the final stages; this candy transitions from liquid to set quickly.
Step-by-Step Instructions
- In the heavy-bottomed saucepan, combine the sugar, corn syrup, heavy cream, and salt. Stir gently over medium heat until the sugar completely dissolves.
- Once the mixture is smooth and begins to bubble, insert the candy thermometer. Increase the heat slightly and bring the mixture to a rolling boil without stirring.
- Monitor the temperature closely. Allow the mixture to cook until it reaches precisely 234°F (112°C), known as the soft-ball stage.
- Immediately remove the saucepan from the heat. Stir in the cubed butter until melted and fully incorporated, then add the vanilla bean paste.
- Carefully pour the hot mixture onto your prepared, buttered surface (marble slab or baking sheet). Do not spread it thin; let it sit in a thick pool.
- Allow the candy to cool until it is just warm enough to handle—about 15 to 20 minutes. It should be firm but still pliable, like thick putty.
- This is where the magic happens: the pulling. Grease your hands thoroughly. Fold the edges of the candy mass toward the center, forming a thick rope. Begin pulling the rope out, folding it back over itself, and repeating this process.
- Continue pulling until the candy turns opaque white and develops a satiny sheen. This can take 10 to 15 minutes of continuous effort. The color change indicates air incorporation, creating the signature creamy texture.
- Once perfectly pulled, stretch the candy into long ropes, about 1/2 inch thick. Use buttered scissors or a knife to quickly cut the ropes into bite-sized pieces. Allow the candy to set fully before serving.
Perfecting the Cooking Process
Achieving the perfect pull requires strict adherence to temperature. Start by melting the sugars and cream slowly; only introduce the butter once the mixture is boiling steadily. Finally, pull the candy quickly after cooling to ensure that signature, satiny texture and melt-in-your-mouth flavor.
Three Tips for Pulling Perfection
- Invest in a reliable candy thermometer; guessing the soft-ball stage (234°F) is a recipe for rock-hard candy or sticky goo—accuracy is vital for the perfect pull.
- Grease your hands with a neutral oil before pulling the candy to prevent burns and sticking. Work quickly and efficiently, as the candy cools and hardens fast.
- If the candy seems too stiff to pull, don’t panic. Gently warm it for 10 seconds in a low-heat oven to make it pliable enough to manage the pulling process.
Troubleshooting Your Candy Adventure
If your candy feels too soft and never seems to set, it means you didn’t reach the target temperature of 234°F. If it’s rock-hard and snaps immediately, you likely overheated it, going closer to 250°F. The soft-ball stage window is small, so precision matters.
If you find the pulling process too difficult, remember that warmth is your friend. If the candy cools down too much, the pulling becomes a literal tug-of-war. The key is to keep it moving while it is still warm, folding and stretching it relentlessly until that opaque color transformation is achieved. Recruit a partner; it makes the task much faster and definitely more fun.
Add Your Touch
While traditionalists stick to vanilla, try swapping half the vanilla bean paste for maple flavor for an autumn twist, or add a pinch of finely crushed, toasted pecans during the pulling stage. You can also substitute the dairy cream with rich coconut cream for a slightly tropical flavor profile.
The first batch I mastered was for a family reunion, and my aunt, who usually critiques everything, ate six pieces before dessert. That’s how I knew I finally nailed the creamy texture.
Storing & Reheating
Store this candy in an airtight container at cool room temperature for up to two weeks, layered between sheets of wax paper to prevent sticking. Never refrigerate; the cold air toughens the texture. If it loses shine, lightly dust with powdered sugar before serving.
Conclusion for Kentucky Cream Pull Candy: A Sweet Tradition You Need to Try
This delightful confection is more than just a sugar rush; it’s a piece of culinary history that rewards effort with unparalleled flavor and texture. Mastering the art of the pull is immensely satisfying, yielding a creamy, buttery candy that simply melts away the moment it hits your tongue. Remember to heed the thermometer, pull quickly when the temperature is right, and never underestimate the power of pure vanilla and rich cream. Whether you are seeking a unique holiday gift or just a perfect evening indulgence, the resultingKentucky Cream Pull Candy: A Sweet Tradition You Need to Tryis absolutely worth the elbow grease required for this spectacular Southern specialty. Get pulling!
(114 words)

Leave a Comment