
No-Bake Chocolate Cake
No-Bake Chocolate Cake is a delightful treat that brings joy to any occasion without the need for an oven. This indulgent dessert is perfect for those hot summer days when you want something sweet but don’t want to heat up your kitchen. The origins of no-bake desserts can be traced back to the need for quick and easy recipes that still deliver on flavor, making them a staple in many households around the world.
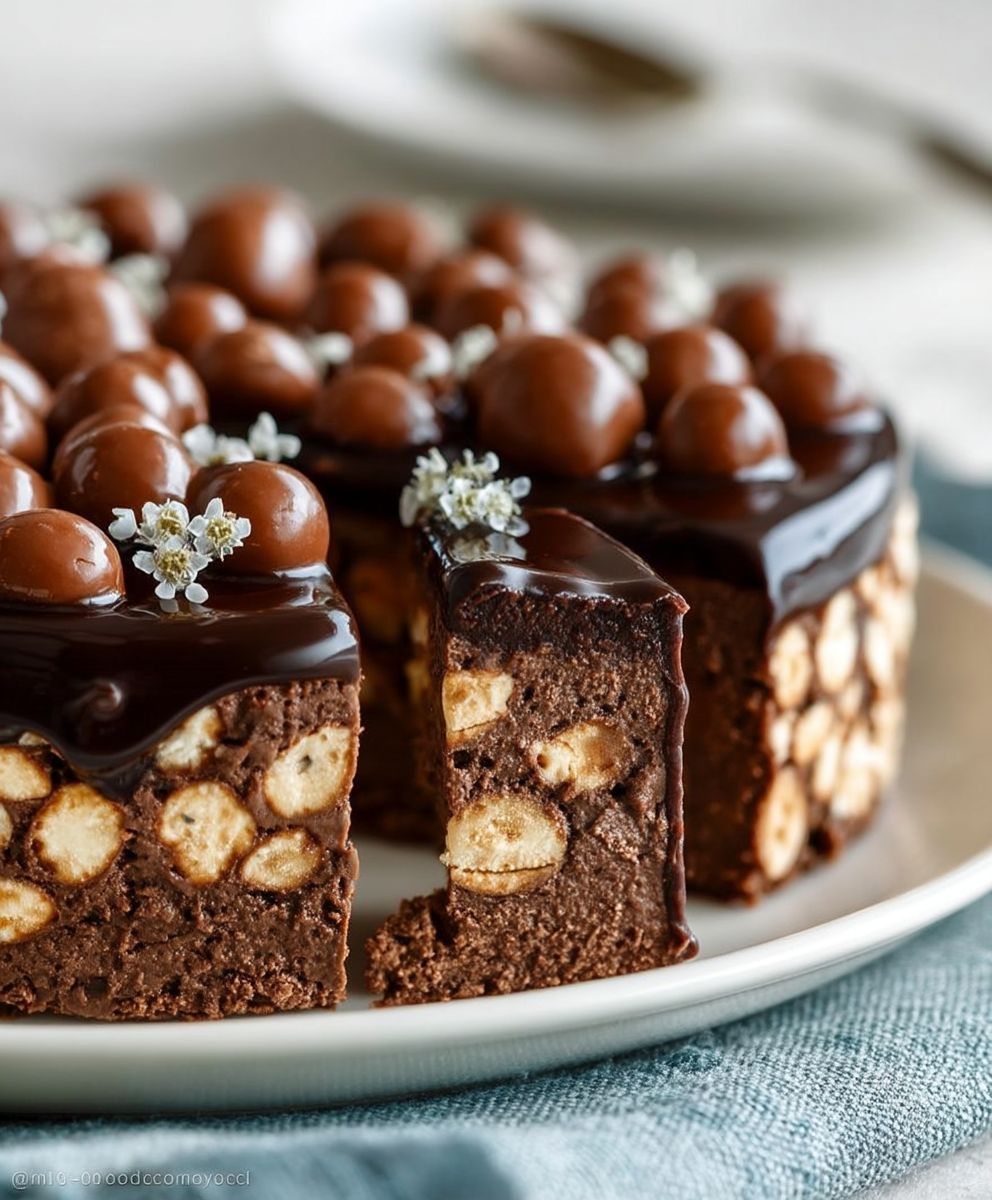
People love this No-Bake Chocolate Cake not only for its rich, velvety texture but also for its incredible convenience. With just a few simple ingredients, you can whip up a dessert that is both satisfying and impressive. The combination of creamy chocolate and a crunchy base creates a delightful contrast that keeps everyone coming back for more. Whether you’re hosting a party or simply treating yourself, this No-Bake Chocolate Cake is sure to become a favorite in your recipe collection.

Ingredients:
- 1 ½ cups of graham cracker crumbs
- ½ cup of unsweetened cocoa powder
- 1 cup of powdered sugar
- 1 cup of unsalted butter, softened
- 1 teaspoon of vanilla extract
- 2 cups of heavy whipping cream
- 1 cup of semi-sweet chocolate chips
- ¼ cup of milk
- Chocolate shavings or cocoa powder for garnish (optional)
Preparing the Base
- In a large mixing bowl, combine the graham cracker crumbs, unsweetened cocoa powder, and powdered sugar. Mix them together until they are well combined.
- Add the softened unsalted butter and vanilla extract to the dry ingredients. Using a spatula or your hands, mix everything together until the mixture resembles wet sand and holds together when pressed.
- Press the mixture firmly into the bottom of a 9-inch springform pan. Make sure to create an even layer, as this will be the base of your cake. Use the back of a measuring cup or your fingers to pack it down tightly.
Making the Chocolate Filling
- In a small saucepan over low heat, combine the semi-sweet chocolate chips and milk. Stir continuously until the chocolate is completely melted and smooth. Remove from heat and let it cool slightly.
- In a separate large mixing bowl, pour in the heavy whipping cream. Using an electric mixer, whip the cream on medium-high speed until soft peaks form. This should take about 3-5 minutes.
- Once the chocolate mixture has cooled slightly, gently fold it into the whipped cream. Use a spatula to combine the two mixtures, being careful not to deflate the whipped cream. Continue folding until there are no streaks of chocolate visible.
Assembling the Cake
- Pour the chocolate filling over the graham cracker base in the springform pan. Use a spatula to spread it evenly across the top.
- Cover the cake with plastic wrap or aluminum foil and place it in the refrigerator. Allow it to chill for at least 4 hours, or overnight if possible. This will help the cake set properly.
Serving the Cake
- Once the cake has set, carefully remove the sides of the springform pan. You can run a knife around the edge to help release it if needed.
- For an extra touch, you can garnish the top of the cake with chocolate shavings or a dusting of cocoa powder. This adds a beautiful finish and enhances the chocolate flavor.
- Slice the cake into wedges using a sharp knife. For clean cuts, dip the knife in hot water and wipe it dry before slicing.
- Serve the cake chilled, and enjoy the rich, creamy chocolate flavor with friends and family!
Tips for Success
- Make sure your butter is softened to room temperature for easier mixing.
- For a richer chocolate flavor, you can use dark chocolate chips instead of semi-sweet.
- If you want to add a little crunch, consider folding in some crushed nuts or chocolate-covered pretzels into the filling.
- To make the cake even more decadent, serve it with a dollop of whipped cream or a scoop of vanilla ice cream on the side.
Storage Instructions
- Store any leftovers in an airtight container in the refrigerator for up to 5 days.
- This cake can also be frozen. Wrap it tightly in plastic wrap and then in aluminum foil. It can be frozen for up to 2 months. Thaw in the refrigerator before serving.
Variations
- For a mint chocolate version, add 1 teaspoon of peppermint extract to the chocolate filling.
- To make a mocha flavor, mix in 1 tablespoon of instant coffee granules with the melted chocolate.
- For a fruit twist, layer fresh raspberries or strawberries on top of the chocolate filling before chilling.
Final Thoughts
Conclusion:
In conclusion, this No-Bake Chocolate Cake is an absolute must-try for anyone who loves rich, decadent desserts without the hassle of turning on the oven. The combination of creamy chocolate, crunchy layers, and a hint of sweetness makes it a delightful treat that is sure to impress your family and friends. Whether you’re hosting a gathering, celebrating a special occasion, or simply indulging in a sweet craving, this cake is the perfect solution.
One of the best things about this No-Bake Chocolate Cake is its versatility. You can easily customize it to suit your taste preferences or dietary needs. For a fruity twist, consider adding layers of fresh berries or banana slices between the chocolate layers. If you’re a fan of nuts, sprinkle some chopped walnuts or almonds on top for added crunch and flavor. You can also experiment with different types of chocolate, such as dark, milk, or even white chocolate, to create a unique flavor profile that you and your guests will love.
When it comes to serving suggestions, this cake pairs beautifully with a dollop of whipped cream or a scoop of vanilla ice cream. You can also drizzle some chocolate sauce or caramel over the top for an extra touch of indulgence. For a more sophisticated presentation, consider garnishing with fresh mint leaves or edible flowers to elevate the visual appeal of your dessert.
I encourage you to give this No-Bake Chocolate Cake a try and experience the joy of creating a delicious dessert that requires minimal effort. It’s perfect for those busy days when you want to whip up something special without spending hours in the kitchen. Plus, the best part is that you can prepare it ahead of time and let it chill in the fridge, making it a convenient option for any occasion.
Once you’ve made this delightful cake, I would love to hear about your experience! Share your thoughts, variations, and any tips you might have in the comments below. Your feedback not only helps me improve but also inspires others to try this fantastic recipe. So, roll up your sleeves, gather your ingredients, and get ready to enjoy a slice of heaven with this No-Bake Chocolate Cake. Happy baking!
No-Bake Chocolate Cake: The Ultimate Easy Recipe for Chocolate Lovers
Indulge in a rich and creamy No-Bake Chocolate Cream Cake with a delightful graham cracker crust and luscious chocolate filling. This easy-to-make dessert is perfect for any occasion and is sure to impress your friends and family!
Ingredients
- 1 ½ cups of graham cracker crumbs
- ½ cup of unsweetened cocoa powder
- 1 cup of powdered sugar
- 1 cup of unsalted butter, softened
- 1 teaspoon of vanilla extract
- 2 cups of heavy whipping cream
- 1 cup of semi-sweet chocolate chips
- ¼ cup of milk
- Chocolate shavings or cocoa powder for garnish (optional)
Instructions
- In einer großen Schüssel die Graham-Cracker-Krümel, ungesüßtes Kakaopulver und Puderzucker vermengen. Gut mischen.
- Die weiche ungesalzene Butter und den Vanilleextrakt hinzufügen. Mischen, bis die Mischung wie nasser Sand aussieht und zusammenhält, wenn sie gedrückt wird.
- Die Mischung fest in den Boden einer 9-Zoll-Springform drücken und eine gleichmäßige Schicht bilden.
- In einem kleinen Topf bei niedriger Hitze die halb-süßen Schokoladenstückchen und die Milch kombinieren. Ständig rühren, bis sie geschmolzen und glatt sind. Vom Herd nehmen und leicht abkühlen lassen.
- In einer separaten großen Schüssel die Schlagsahne einfüllen. Bei mittlerer bis hoher Geschwindigkeit schlagen, bis weiche Spitzen entstehen (ca. 3-5 Minuten).
- Die abgekühlte Schokoladenmischung vorsichtig unter die Schlagsahne heben, bis keine Schokoladenstreifen mehr sichtbar sind.
- Die Schokoladenfüllung über die Graham-Cracker-Basis in der Springform gießen. Gleichmäßig mit einem Spatel verteilen.
- Mit Frischhaltefolie oder Aluminiumfolie abdecken und mindestens 4 Stunden oder über Nacht im Kühlschrank kühlen.
- Nach dem Festwerden vorsichtig die Seiten der Springform entfernen. Bei Bedarf mit einem Messer am Rand entlangfahren.
- Nach Belieben mit Schokoladenspänen oder Kakaopulver garnieren.
- In Stücke schneiden und kalt servieren. Genießen!
Notes
- Ensure butter is softened for easier mixing.
- For a richer flavor, use dark chocolate chips.
- Consider folding in crushed nuts or chocolate-covered pretzels for added texture.
- Serve with whipped cream or vanilla ice cream for extra decadence.
Leave a Comment