
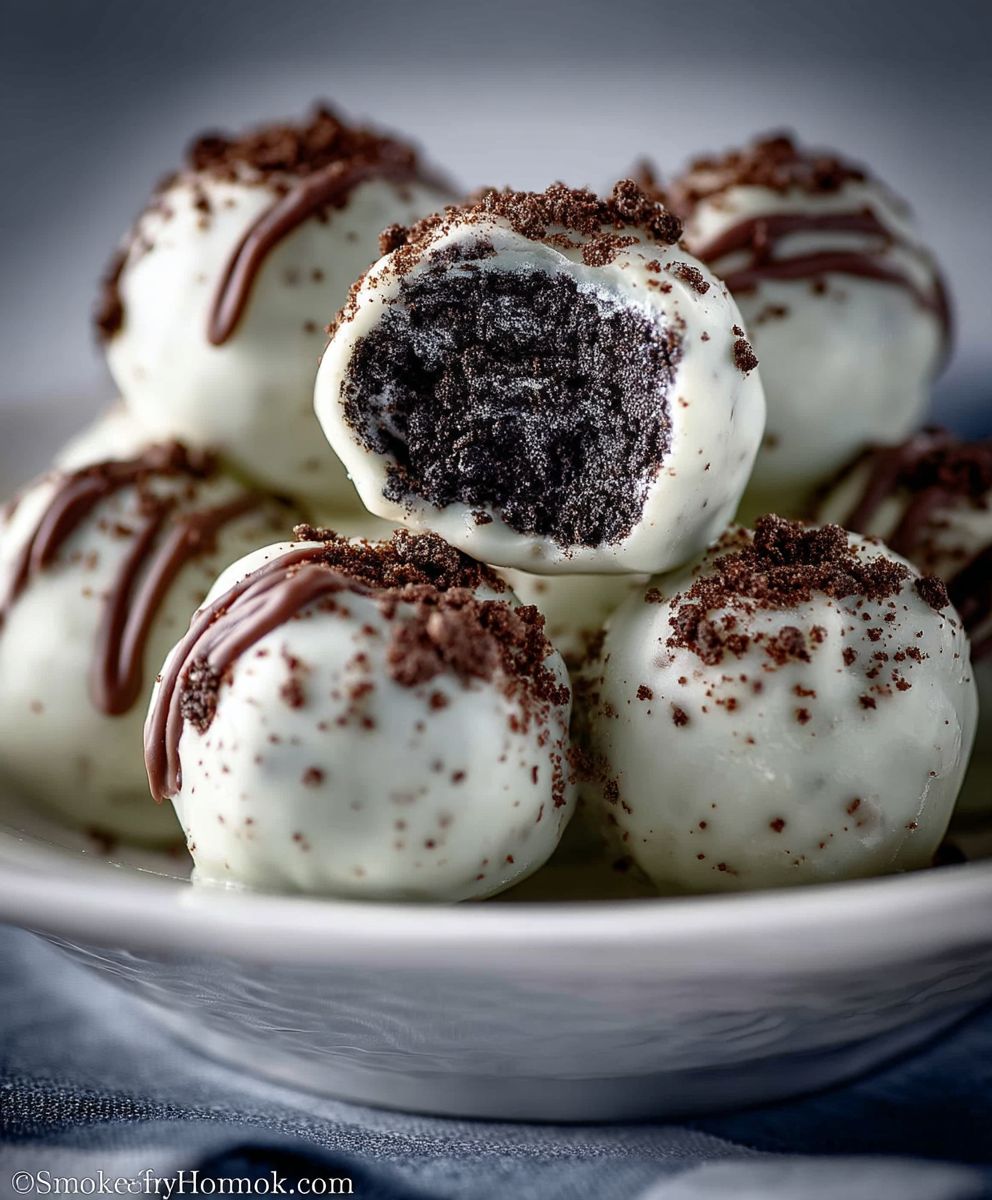
No-Bake Oreo Cake Balls
No-Bake Oreo Cake Balls are a delightful treat that combines the rich, creamy flavor of Oreos with the convenience of a no-bake recipe. These little bites of heaven are perfect for any occasion, whether it’s a birthday party, a holiday gathering, or simply a sweet indulgence after a long day. The history of this dessert can be traced back to the popularization of Oreos in the early 20th century, and since then, creative bakers have transformed this classic cookie into various delectable forms.
People love No-Bake Oreo Cake Balls not just for their irresistible taste but also for their delightful texture. The combination of crushed Oreos and cream cheese creates a rich, velvety filling that is then coated in a smooth layer of chocolate. This contrast of textures makes each bite a truly satisfying experience. Plus, the convenience of not needing an oven means you can whip these up in no time, making them a favorite for busy bakers like myself. So, let’s dive into this easy recipe and discover how to make these scrumptious No-Bake Oreo Cake Balls that everyone will adore!

Ingredients:
- 1 package (15.5 oz) Oreo cookies
- 8 oz cream cheese, softened
- 1 cup semi-sweet chocolate chips
- 1 tablespoon vegetable oil (optional)
- Sprinkles or crushed Oreos for decoration (optional)
Preparing the Oreo Mixture
- Start by placing the Oreo cookies in a food processor. Pulse them until they are finely crushed into a powder. This should take about 30 seconds to 1 minute. If you don’t have a food processor, you can place the cookies in a zip-top bag and crush them with a rolling pin.
- In a large mixing bowl, combine the crushed Oreos with the softened cream cheese. Using a spatula or your hands, mix until the mixture is well combined and forms a dough-like consistency. It’s important that the cream cheese is softened to ensure it blends well with the cookie crumbs.
- Once the mixture is combined, cover the bowl with plastic wrap and refrigerate for about 30 minutes. This will make it easier to form the balls.
Forming the Cake Balls
- After the mixture has chilled, take it out of the refrigerator. Using a small cookie scoop or your hands, scoop out about 1 tablespoon of the mixture and roll it into a ball. Place the balls on a baking sheet lined with parchment paper.
- Continue this process until all the mixture is rolled into balls. You should get about 20-25 cake balls, depending on the size you make them.
- Once all the balls are formed, place the baking sheet back in the refrigerator for another 15-20 minutes to firm them up. This step is crucial for ensuring they hold their shape when dipped in chocolate.
Melting the Chocolate
- While the cake balls are chilling, it’s time to melt the chocolate. In a microwave-safe bowl, add the semi-sweet chocolate chips. If you want a smoother consistency, you can add 1 tablespoon of vegetable oil to the chocolate chips.
- Microwave the chocolate in 30-second intervals, stirring in between, until it is completely melted and smooth. Be careful not to overheat the chocolate, as it can burn easily.
- Once melted, remove the bowl from the microwave and let it cool for a minute. This will help prevent the chocolate from being too hot when you dip the cake balls.
Dipping the Cake Balls
- Take the chilled cake balls out of the refrigerator. Using a fork or a dipping tool, dip each ball into the melted chocolate, ensuring it is fully coated. Allow any excess chocolate to drip off.
- Carefully place the dipped cake ball back onto the parchment-lined baking sheet. If you want to add sprinkles or crushed Oreos for decoration, do so immediately after dipping, while the chocolate is still wet.
- Repeat this process for all the cake balls. If the chocolate starts to thicken, you can reheat it in the microwave for a few seconds to get it back to a dipping consistency.
Setting the Cake Balls
- Once all the cake balls are dipped and decorated, place the baking sheet in the refrigerator for about 30 minutes to allow the chocolate to set completely.
- After the chocolate has hardened, you can transfer the cake balls to an airtight container for storage. They can be kept in the refrigerator for up to a week or in the freezer for up to a month.
Serving Suggestions
- When you’re ready to serve, you can arrange the cake balls on a decorative platter. They make a great treat for parties, holidays, or just a fun dessert at home.
- If you want to get creative, consider drizzling some white chocolate over the top of the set cake balls for an elegant touch. Simply melt some white chocolate chips and use a fork to drizzle it over the balls.
- For an extra special presentation, you can place each cake ball in a mini cupcake liner. This not only looks cute but also makes them easy to grab and enjoy!
Tips and Variations
- 1 package (15.5 oz) Oreo cookies
- 8 oz cream cheese, softened
- 1 cup semi-sweet chocolate chips
- 1 tablespoon vegetable oil (optional)
- Sprinkles or crushed Oreos for decoration (optional)
- Start by placing the Oreo cookies in a food processor. Pulse them until they are finely crushed into a powder (about 30 seconds to 1 minute). Alternatively, place the cookies in a zip-top bag and crush them with a rolling pin.
- In a large mixing bowl, combine the crushed Oreos with the softened cream cheese. Mix until well combined and forms a dough-like consistency.
- Cover the bowl with plastic wrap and refrigerate for about 30 minutes.
- After chilling, scoop out about 1 tablespoon of the mixture and roll it into a ball. Place the balls on a baking sheet lined with parchment paper.
- Continue until all the mixture is rolled into balls (about 20-25).
- Refrigerate the baking sheet for another 15-20 minutes to firm up the balls.
- In a microwave-safe bowl, add the semi-sweet chocolate chips and optional vegetable oil for a smoother consistency.
- Microwave in 30-second intervals, stirring in between, until melted and smooth. Let cool for a minute.
- Dip each chilled cake ball into the melted chocolate, ensuring it is fully coated. Allow excess chocolate to drip off.
- Place the dipped cake ball back onto the parchment-lined baking sheet. Add sprinkles or crushed Oreos for decoration while the chocolate is still wet.
- Repeat for all cake balls, reheating chocolate if necessary.
- Refrigerate the baking sheet for about 30 minutes to allow the chocolate to set completely.
- Transfer the cake balls to an airtight container for storage. They can be kept in the refrigerator for up to a week or in the freezer for up to a month.
- Arrange the cake balls on a decorative platter for serving.
- Drizzle melted white chocolate over the set cake balls for an elegant touch.
- Place each cake ball in a mini cupcake liner for a cute presentation.
- Ensure the cream cheese is softened for easy mixing.
- You can customize the decorations based on the occasion.
Conclusion:
In conclusion, these No-Bake Oreo Cake Balls are an absolute must-try for anyone looking to indulge in a sweet treat without the hassle of baking. The combination of creamy cream cheese and crushed Oreo cookies creates a delightful flavor that is both rich and satisfying. Plus, the fact that they require no baking makes them a perfect option for those who may not have the time or inclination to turn on the oven. Whether you’re preparing for a party, a family gathering, or simply craving a delicious snack, these cake balls are sure to impress.
When it comes to serving suggestions, the possibilities are endless! You can roll the cake balls in various toppings such as crushed nuts, sprinkles, or even melted chocolate for an extra layer of flavor and texture. For a fun twist, consider adding a splash of peppermint extract to the cream cheese mixture for a festive holiday version. You could also experiment with different types of cookies, like chocolate chip or peanut butter, to create your own unique variations. The versatility of this recipe allows you to get creative and tailor it to your taste preferences.
I encourage you to give this No-Bake Oreo Cake Balls recipe a try. It’s not only simple and quick to make, but it also yields a deliciously addictive treat that everyone will love. Once you’ve made them, don’t forget to share your experience! I would love to hear how they turned out for you and any variations you tried. You can share your thoughts in the comments below or on social media. Tagging your creations with #OreoCakeBalls will help us all connect and inspire each other in the kitchen.
So, gather your ingredients, roll up your sleeves, and dive into this delightful no-bake adventure. I promise you won’t regret it! These cake balls are perfect for satisfying your sweet tooth and are sure to become a favorite in your dessert repertoire. Happy baking (or should I say, mixing)!
No-Bake Oreo Cake Balls: Easy Recipe for Delicious Treats
These Oreo Cake Balls are a delightful treat made from crushed Oreo cookies and cream cheese, coated in rich chocolate. Perfect for parties or as a sweet snack, they are easy to make and can be customized with fun decorations. Enjoy these bite-sized indulgences that are sure to please any crowd!


Leave a Comment