
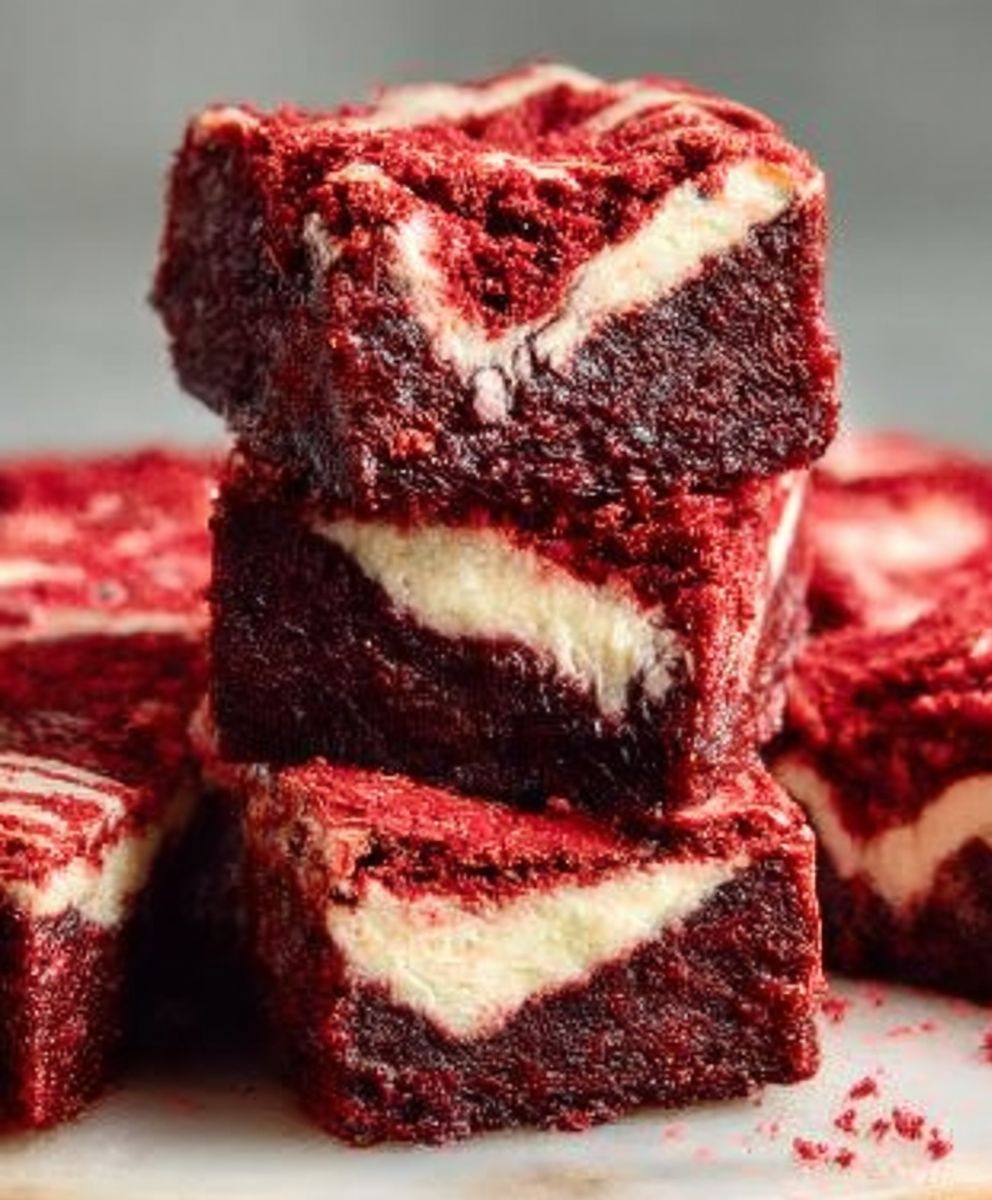
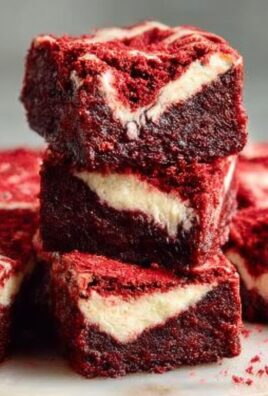
Red Velvet Brownies: A Decadent Delight
Red Velvet Brownies are not just a dessert; they are a celebration of flavor and color that brings joy to any occasion. With their rich, velvety texture and a hint of cocoa, these brownies are a delightful twist on the classic red velvet cake. Originating from the Southern United States, red velvet desserts have a storied history, often associated with special celebrations and gatherings. The vibrant red hue, combined with a creamy cream cheese frosting, makes these brownies a showstopper at any event.
People love Red Velvet Brownies for their unique taste and texture. The combination of fudgy brownie goodness with the subtle tang of buttermilk creates a mouthwatering experience that is hard to resist. Plus, they are incredibly convenient to make, requiring minimal ingredients and time. Whether you’re baking for a birthday party, a holiday gathering, or simply to satisfy your sweet tooth, Red Velvet Brownies are sure to impress. Join me as we dive into this delicious recipe that will have everyone asking for seconds!
Ingredients:
- 1 cup (2 sticks) unsalted butter, melted
- 1 ½ cups granulated sugar
- 1 cup packed brown sugar
- 4 large eggs
- 2 teaspoons vanilla extract
- 2 cups all-purpose flour
- 1 teaspoon cocoa powder
- 1 teaspoon baking powder
- ½ teaspoon salt
- 1 tablespoon red food coloring
- 1 cup white chocolate chips (optional)
- 1 cup cream cheese frosting (for topping)
Preparing the Batter
- Preheat your oven to 350°F (175°C). Grease a 9×13 inch baking pan with butter or line it with parchment paper for easy removal.
- In a large mixing bowl, combine the melted butter, granulated sugar, and brown sugar. Whisk them together until the mixture is smooth and well combined.
- Add the eggs, one at a time, mixing well after each addition. This helps to incorporate air into the batter, making the brownies light and fluffy.
- Stir in the vanilla extract until fully incorporated.
- In a separate bowl, sift together the all-purpose flour, cocoa powder, baking powder, and salt. This step is crucial as it helps to aerate the flour and ensures that there are no lumps in your dry ingredients.
- Gradually add the dry ingredients to the wet mixture, stirring gently until just combined. Be careful not to overmix, as this can lead to dense brownies.
- Now, it’s time to add the star of the show! Pour in the red food coloring and mix until the batter is a vibrant red color. If you want a deeper red, feel free to add a bit more food coloring.
- If you’re using white chocolate chips, fold them into the batter at this stage. They add a delightful sweetness and texture to the brownies.
Cooking Process
- Pour the brownie batter into the prepared baking pan, spreading it evenly with a spatula.
- Bake in the preheated oven for 25-30 minutes. To check for doneness, insert a toothpick into the center of the brownies. It should come out with a few moist crumbs, but not wet batter.
- Once baked, remove the brownies from the oven and allow them to cool in the pan for about 10-15 minutes. This cooling period helps them set up a bit more.
- After they have cooled slightly, transfer the brownies to a wire rack to cool completely. This will ensure they don’t become soggy from steam.
Assembling and Topping
- Once the brownies are completely cool, it’s time to frost them! If you’re using store-bought cream cheese frosting, give it a good stir to make it smooth and spreadable.
- Using a spatula, spread an even layer of cream cheese frosting over the top of the brownies. You can be generous with the frosting, as it complements the rich chocolate flavor beautifully.
- For an extra touch, you can sprinkle some additional white chocolate chips or even some red sprinkles on top of the frosting for a festive look.
- Using a sharp knife, cut the brownies into squares or rectangles, depending on your preference. Wipe the knife with a damp cloth between cuts to keep the edges clean.
- Serve the brownies on a platter or store them in an airtight container in the refrigerator for up to a week. They can also be frozen for longer storage.
Tips for Perfect Red Velvet Brownies
- Quality Ingredients: Use high-quality cocoa powder and food coloring for the best flavor and color.
- Don’t Overbake: Keep an eye on the brownies as they bake. Overbaking can lead to dry brownies, so it’s better to err on the side of underbaking slightly.
- Let Them Cool: Allowing the brownies to cool completely before frosting is key to preventing the frosting from melting and sliding off.
- 1 cup (2 sticks) unsalted butter, melted
- 1 ½ cups granulated sugar
- 1 cup packed brown sugar
- 4 large eggs
- 2 teaspoons vanilla extract
- 2 cups all-purpose flour
- 1 teaspoon cocoa powder
- 1 teaspoon baking powder
- ½ teaspoon salt
- 1 tablespoon red food coloring
- 1 cup white chocolate chips (optional)
- 1 cup cream cheese frosting (for topping)
- Preheat your oven to 350°F (175°C). Grease a 9×13 inch baking pan with butter or line it with parchment paper for easy removal.
- In a large mixing bowl, combine the melted butter, granulated sugar, and brown sugar. Whisk them together until the mixture is smooth and well combined.
- Add the eggs, one at a time, mixing well after each addition to incorporate air into the batter.
- Stir in the vanilla extract until fully incorporated.
- In a separate bowl, sift together the all-purpose flour, cocoa powder, baking powder, and salt.
- Gradually add the dry ingredients to the wet mixture, stirring gently until just combined. Avoid overmixing.
- Pour in the red food coloring and mix until the batter is a vibrant red color. Add more food coloring for a deeper shade if desired.
- If using, fold in the white chocolate chips.
- Pour the brownie batter into the prepared baking pan, spreading it evenly with a spatula.
- Bake in the preheated oven for 25-30 minutes. Check for doneness by inserting a toothpick into the center; it should come out with a few moist crumbs.
- Remove the brownies from the oven and allow them to cool in the pan for about 10-15 minutes.
- Transfer the brownies to a wire rack to cool completely.
- Once the brownies are completely cool, stir the cream cheese frosting to make it smooth and spreadable.
- Spread an even layer of cream cheese frosting over the top of the brownies.
- Optionally, sprinkle additional white chocolate chips or red sprinkles on top for decoration.
- Cut the brownies into squares or rectangles, wiping the knife with a damp cloth between cuts for clean edges.
- Serve on a platter or store in an airtight container in the refrigerator for up to a week. They can also be frozen for longer storage.
- Use high-quality cocoa powder and food coloring for the best flavor and color.
- Keep an eye on the brownies while baking to avoid overbaking, which can lead to dryness.
- Allow the brownies to cool completely before frosting to prevent the frosting from melting.
Conclusion:
If you’re looking for a dessert that’s not only visually stunning but also incredibly delicious, these Red Velvet Brownies are an absolute must-try! The rich, velvety texture combined with the subtle hint of cocoa and the tangy cream cheese frosting creates a flavor profile that is simply irresistible. Whether you’re celebrating a special occasion or just indulging in a sweet treat, these brownies will surely impress your family and friends.
For serving suggestions, I recommend pairing these Red Velvet Brownies with a scoop of vanilla ice cream or a dollop of whipped cream to enhance the overall experience. The contrast of the warm brownie with the cold ice cream is heavenly! You can also sprinkle some crushed nuts or chocolate chips on top for an added crunch, or even drizzle some chocolate or caramel sauce for an extra touch of decadence. If you’re feeling adventurous, try adding a hint of peppermint extract to the cream cheese frosting for a refreshing twist, or incorporate some red and white sprinkles for a festive look.
I encourage you to give this recipe a try and experience the joy of baking these delightful Red Velvet Brownies. They are perfect for gatherings, potlucks, or simply as a treat for yourself after a long day. Don’t forget to share your experience with friends and family! I would love to hear how your brownies turned out and any variations you tried. You can even snap a picture and share it on social media—tagging your posts will inspire others to join in on the fun of baking these delicious treats.
In conclusion, these Red Velvet Brownies are not just a dessert; they are an experience that brings joy and satisfaction with every bite. So roll up your sleeves, gather your ingredients, and let’s get baking! I promise you won’t regret it, and your taste buds will thank you. Happy baking!
Red Velvet Brownies: The Ultimate Recipe for a Decadent Treat
Indulge in rich and vibrant Red Velvet Brownies topped with creamy cream cheese frosting. These fudgy brownies offer a delightful twist on classic red velvet cake, making them perfect for any occasion.
Leave a Comment