
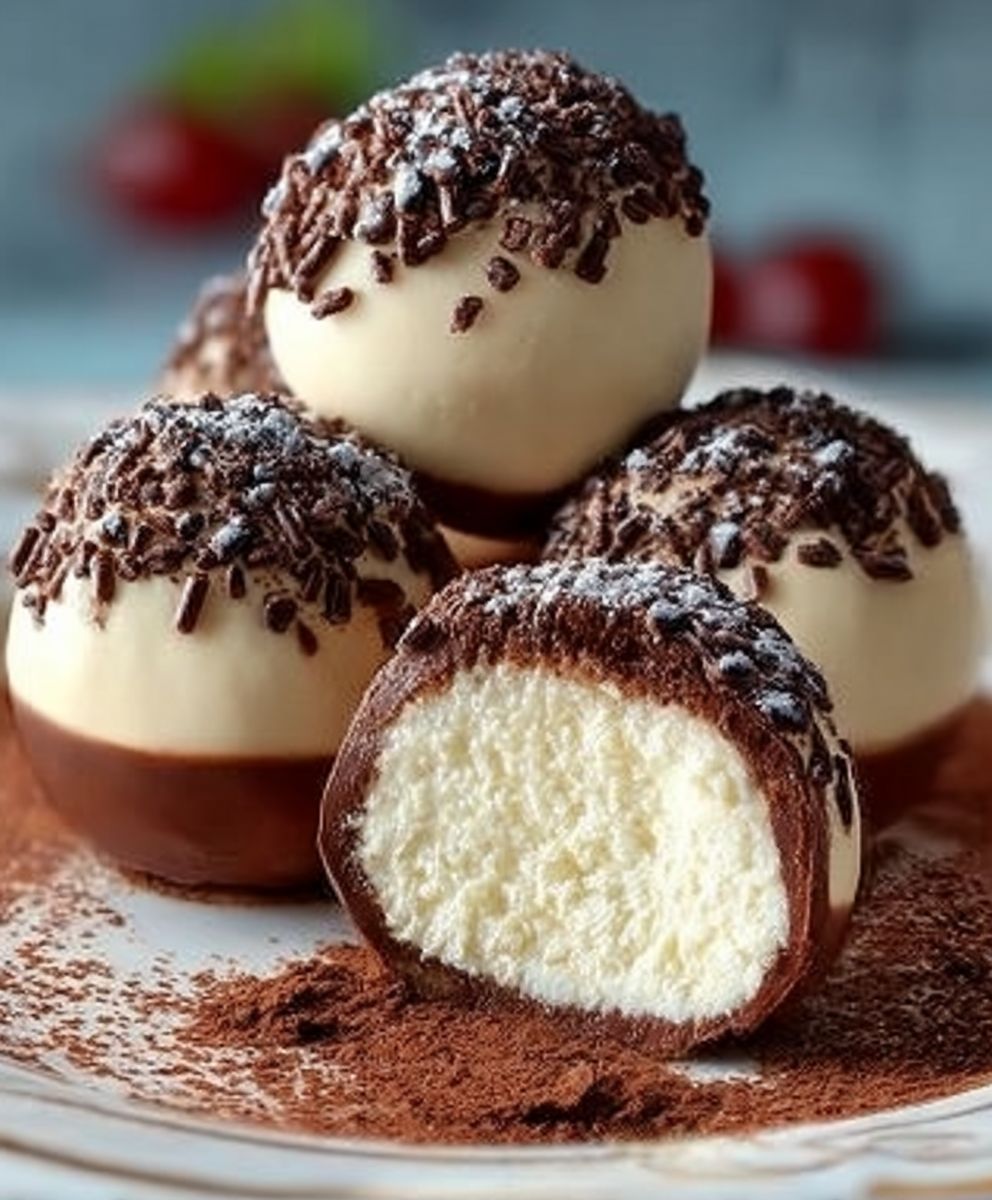
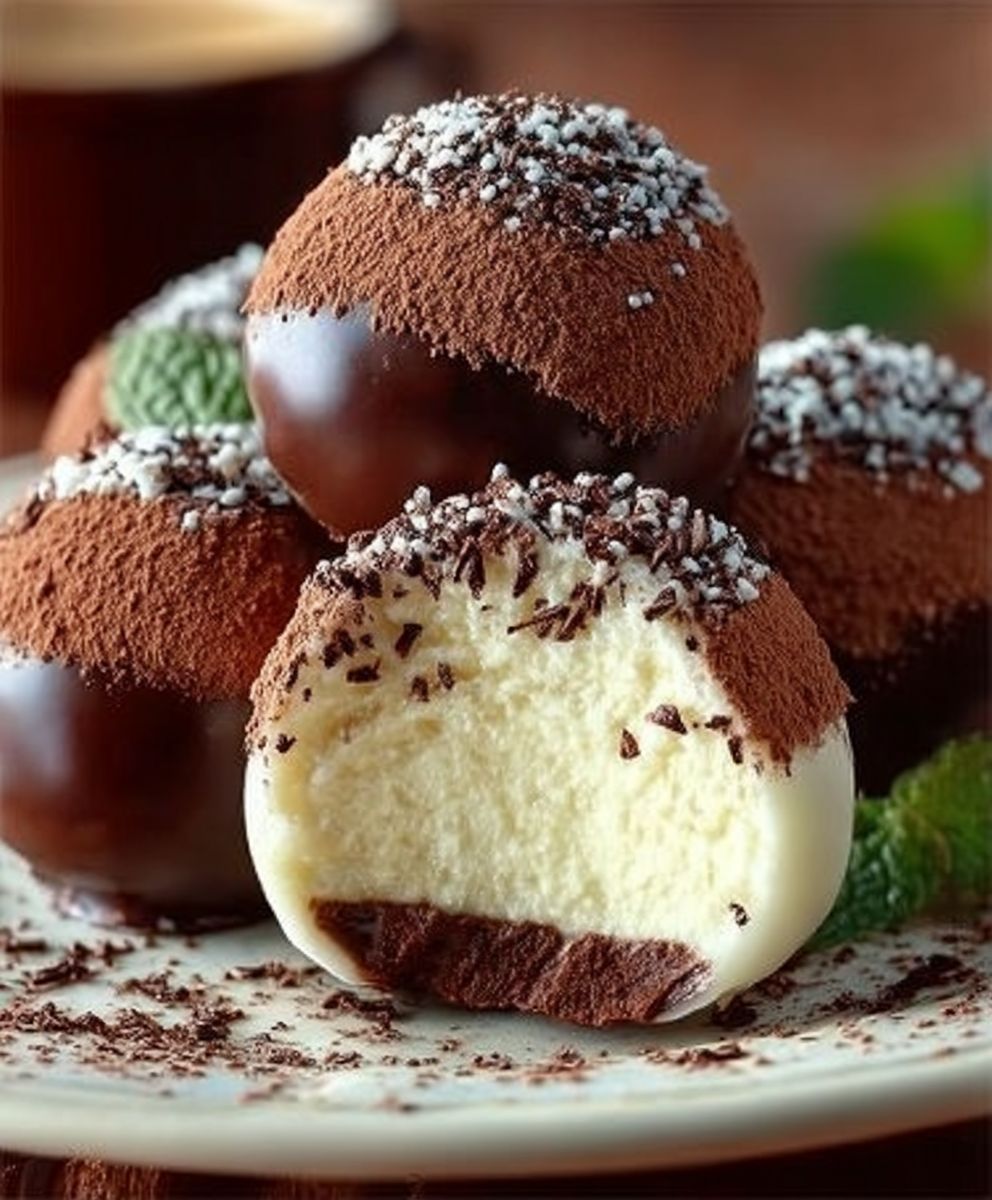
Tiramisu Truffles are a delightful twist on the classic Italian dessert that has captured the hearts of many around the world. Imagine indulging in the rich, creamy layers of coffee-soaked ladyfingers and mascarpone cheese, all encapsulated in a bite-sized truffle. This recipe not only brings the beloved flavors of tiramisu to a new form but also makes it incredibly convenient for sharing at gatherings or enjoying as a personal treat.
The history of tiramisu dates back to the 1960s in Italy, where it quickly became a staple in Italian cuisine, celebrated for its luxurious taste and elegant presentation. People love tiramisu truffles for their perfect balance of sweetness and bitterness, combined with a velvety texture that melts in your mouth. These truffles are not just a dessert; they are an experience that evokes the warmth of Italian hospitality and the joy of indulgence. Join me as we explore how to create these irresistible tiramisu truffles that will surely impress your friends and family!
Ingredients:
- 1 cup of strong brewed coffee, cooled
- 1 tablespoon of coffee liqueur (optional)
- 8 ounces of mascarpone cheese, softened
- 1 cup of heavy cream
- 1/2 cup of granulated sugar
- 1 teaspoon of vanilla extract
- 1 cup of crushed ladyfinger cookies
- 1/4 cup of unsweetened cocoa powder, for dusting
- 1/2 cup of dark chocolate, melted (for coating)
- Chocolate shavings or cocoa powder, for garnish
Preparing the Filling
- In a medium bowl, combine the cooled brewed coffee and coffee liqueur (if using). Set aside.
- In a separate large mixing bowl, add the softened mascarpone cheese. Using a hand mixer or a whisk, beat the mascarpone until smooth and creamy.
- In another bowl, whip the heavy cream until soft peaks form. Gradually add the granulated sugar and continue to whip until stiff peaks form.
- Gently fold the whipped cream into the mascarpone mixture. Be careful not to deflate the whipped cream; you want to keep it light and airy.
- Once combined, add the vanilla extract and mix until just incorporated.
- Now, gradually fold in the crushed ladyfinger cookies into the mascarpone and whipped cream mixture. Ensure that the cookies are evenly distributed throughout the filling.
Chilling the Mixture
- Cover the bowl with plastic wrap or a lid and place it in the refrigerator. Allow the mixture to chill for at least 2 hours, or until it is firm enough to scoop.
- While the filling is chilling, you can prepare your workspace for rolling the truffles. Line a baking sheet with parchment paper to place the truffles on once they are formed.
Forming the Truffles
- Once the filling has chilled and is firm, remove it from the refrigerator. Using a small cookie scoop or a tablespoon, scoop out portions of the filling.
- Roll each scoop between your palms to form a smooth ball. The size of each truffle can be about 1 inch in diameter, but feel free to adjust based on your preference.
- Place the rolled truffles onto the prepared baking sheet. Continue this process until all the filling has been used.
- Once all the truffles are formed, place the baking sheet back in the refrigerator for about 30 minutes to firm up again.
Coating the Truffles
- While the truffles are chilling, melt the dark chocolate in a microwave-safe bowl. Heat in 30-second intervals, stirring in between, until the chocolate is completely melted and smooth.
- Once the truffles are firm, remove them from the refrigerator. Using a fork or a toothpick, dip each truffle into the melted chocolate, ensuring it is fully coated.
- Allow any excess chocolate to drip off before placing the coated truffle back onto the parchment-lined baking sheet.
- While the chocolate is still wet, dust the tops of the truffles with cocoa powder or sprinkle with chocolate shavings for an elegant touch.
- Repeat this process until all the truffles are coated in chocolate.
Final Chilling and Serving
- Once all the truffles are coated and garnished, place the baking sheet back in the refrigerator for at least 30 minutes to allow the chocolate coating to set completely.
- After the chocolate has hardened, you can transfer the truffles to an airtight container. They can be stored in the refrigerator for up to a week, but I recommend enjoying them within a few days for the best flavor and texture.
- When ready to serve, arrange the tiramisu truffles on a beautiful serving platter. You can also dust them with a little extra cocoa powder or sprinkle more chocolate shavings on top for a stunning presentation.
Tips for Success
- Make sure your coffee is strong and
Conclusion:
If you’re looking for a delightful treat that combines the rich flavors of coffee and chocolate with a creamy texture, then these Tiramisu Truffles are an absolute must-try! Not only do they capture the essence of the classic Italian dessert, but they also offer a fun and bite-sized way to enjoy it. The combination of mascarpone cheese, espresso, and cocoa powder creates a luxurious flavor profile that is sure to impress your family and friends. Plus, they are surprisingly easy to make, making them perfect for both novice and experienced bakers alike.
When it comes to serving suggestions, these truffles are incredibly versatile. You can roll them in cocoa powder for a classic look, or get creative by coating them in crushed nuts, shredded coconut, or even colorful sprinkles for a festive touch. For a more indulgent experience, consider drizzling some melted chocolate over the top or serving them alongside a dollop of whipped cream. They also pair beautifully with a cup of coffee or a glass of dessert wine, making them an excellent choice for after-dinner treats or special occasions.
If you’re feeling adventurous, don’t hesitate to experiment with variations of the Tiramisu Truffles. You could infuse the truffles with different flavors by adding a splash of flavored liqueur, such as amaretto or coffee liqueur, to the mixture. Alternatively, you could swap out the traditional cocoa powder for matcha powder for a unique twist that adds a vibrant green color and a hint of earthiness. The possibilities are endless, and I encourage you to make this recipe your own!
I genuinely believe that once you try these Tiramisu Truffles, they will become a staple in your dessert repertoire. They are perfect for gatherings, holiday celebrations, or simply as a sweet treat to enjoy at home. I would love to hear about your experience making them! Please share your thoughts, any variations you tried, or even photos of your creations. Your feedback not only inspires me but also helps others discover the joy of making these delightful truffles.
So, roll up your sleeves, gather your ingredients, and dive into the world of Tiramisu Truffles. I promise you won’t regret it! Happy baking!
Tiramisu Truffles: A Decadent Dessert Recipe You Must Try
Enjoy these Tiramisu Truffles, a delightful twist on the classic Italian dessert. Each bite features creamy mascarpone, coffee-soaked ladyfingers, and a rich chocolate coating, making them a perfect treat for any occasion.
Ingredients
- 1 cup of strong brewed coffee, cooled
- 1 tablespoon of coffee liqueur (optional)
- 8 ounces of mascarpone cheese, softened
- 1 cup of heavy cream
- 1/2 cup of granulated sugar
- 1 teaspoon of vanilla extract
- 1 cup of crushed ladyfinger cookies
- 1/4 cup of unsweetened cocoa powder, for dusting
- 1/2 cup of dark chocolate, melted (for coating)
- Chocolate shavings or cocoa powder, for garnish
Instructions
- In a medium bowl, combine the cooled brewed coffee and coffee liqueur (if using). Set aside.
- In a separate large mixing bowl, add the softened mascarpone cheese. Using a hand mixer or a whisk, beat the mascarpone until smooth and creamy.
- In another bowl, whip the heavy cream until soft peaks form. Gradually add the granulated sugar and continue to whip until stiff peaks form.
- Gently fold the whipped cream into the mascarpone mixture. Be careful not to deflate the whipped cream; you want to keep it light and airy.
- Once combined, add the vanilla extract and mix until just incorporated.
- Gradually fold in the crushed ladyfinger cookies into the mascarpone and whipped cream mixture, ensuring even distribution.
- Cover the bowl with plastic wrap or a lid and place it in the refrigerator. Allow the mixture to chill for at least 2 hours, or until firm enough to scoop.
- While the filling is chilling, prepare your workspace by lining a baking sheet with parchment paper.
- Once the filling has chilled and is firm, remove it from the refrigerator. Using a small cookie scoop or a tablespoon, scoop out portions of the filling.
- Roll each scoop between your palms to form a smooth ball, about 1 inch in diameter.
- Place the rolled truffles onto the prepared baking sheet. Continue until all filling is used.
- Place the baking sheet back in the refrigerator for about 30 minutes to firm up again.
- Melt the dark chocolate in a microwave-safe bowl, heating in 30-second intervals and stirring until smooth.
- Remove the truffles from the refrigerator. Dip each truffle into the melted chocolate using a fork or toothpick, ensuring full coating.
- Allow excess chocolate to drip off before placing the coated truffle back onto the parchment-lined baking sheet.
- While the chocolate is still wet, dust the tops with cocoa powder or sprinkle with chocolate shavings.
- Repeat until all truffles are coated.
- Place the baking sheet back in the refrigerator for at least 30 minutes to set the chocolate coating.
- Once hardened, transfer the truffles to an airtight container. They can be stored in the refrigerator for up to a week, but best enjoyed within a few days.
- When ready to serve, arrange the truffles on a platter and dust with extra cocoa powder or sprinkle with chocolate shavings for presentation.
Notes
- Ensure your coffee is strong for the best flavor.
- Adjust the size of the truffles according to your preference.
- For a more intense coffee flavor, consider adding more coffee liqueur.
Leave a Comment